


The garage is the one room almost every house plan draws as an afterthought — a slab, a roll-up door, and whatever ceiling height the trusses happened to leave. I spend most of my week reading drawings and walking renovation sites across the Hudson Valley, and I keep coming back to the garage because it is the highest-leverage square footage in the house: already framed, already roofed, already powered, and almost always wasted. These six makeovers run from a glossy showroom to a quiet electronics studio. For each one I want to read what the original space gave you, then show you the moves that turned it into a room you actually want to stand in.
How I Read a Garage Before I Touch It
A garage renovation lives or dies on three things the plan already decided for you, long before anyone picked a cabinet color. First, the slab: is it flat, is it cracked, and does it pitch toward the door for drainage? That pitch tells me whether an epoxy coat will pool or sheet. Second, the ceiling: open joists or trusses, and how much usable headroom sits under the lowest member after you allow for lighting and a garage-door track. Third, the electrical: where the panel sits, how many circuits feed the space, and whether there is a single 15-amp string of outlets or a real subpanel. Get those three right on paper and the finish work is the easy part.
The other thing I look for is the boundary between storage and work. A garage that tries to be both a parking bay and a shop usually fails at both, because the car forces every other function against the walls. The strongest of these six makeovers all made a programmatic decision first — this is a showroom, this is a mechanic's bay, this is a maker's studio — and then let that decision drive the materials. If you want a deeper run through the same idea, my earlier piece on six garage transformations from cluttered chaos to curated spaces walks the same wall-by-wall logic on a different set of rooms.
1. The Showroom Garage: Slatwall Sanctuary
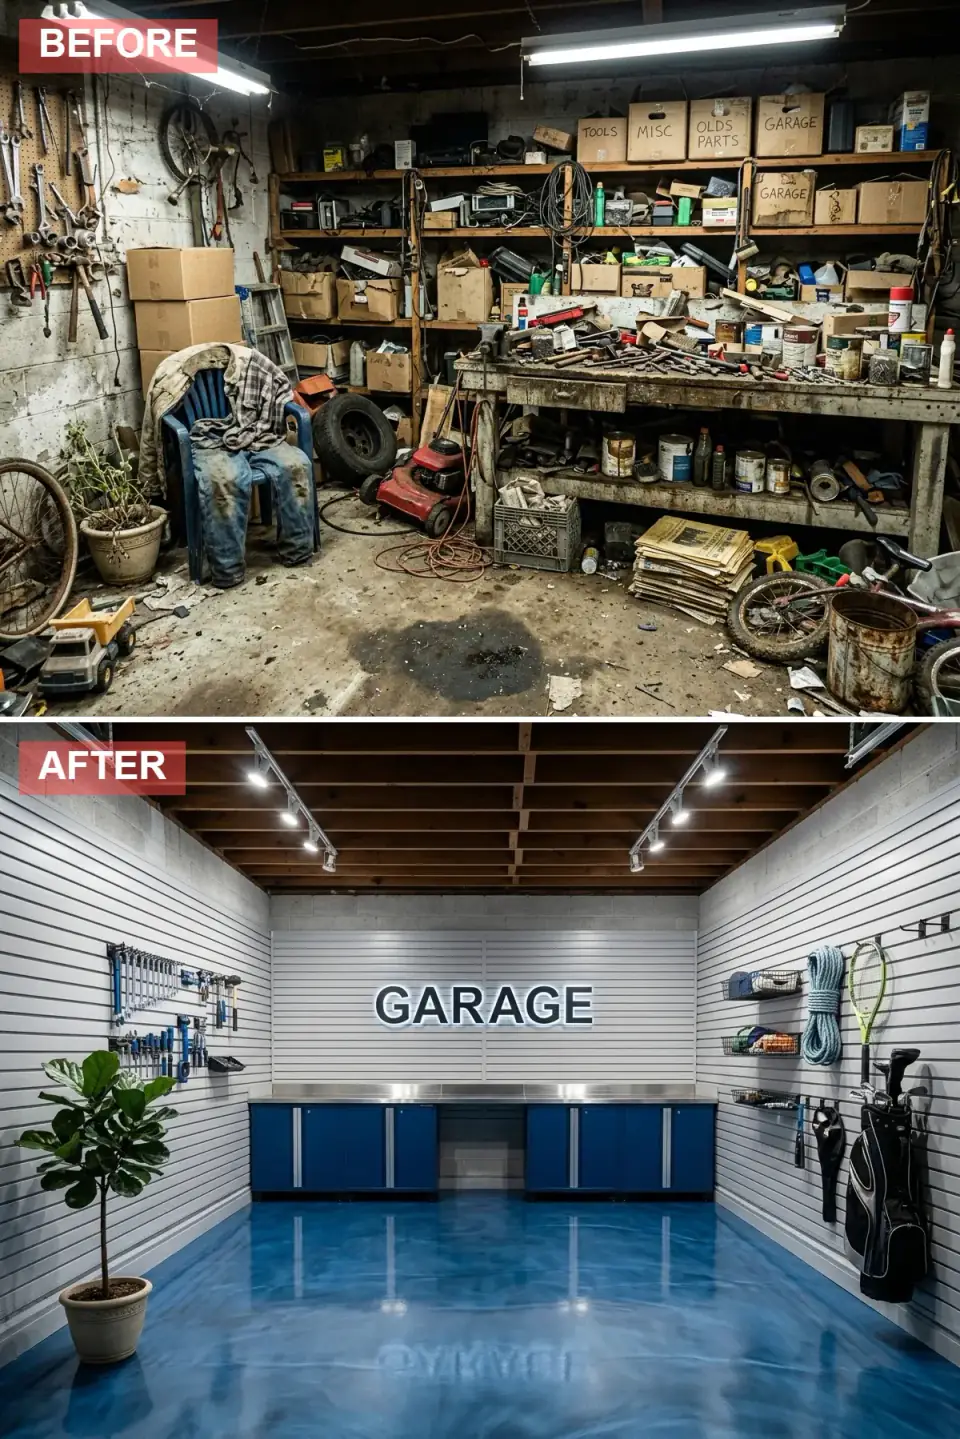
This one trades grime for gallery. The raw cinder block disappears behind clean white slatwall panels, the oil-stained slab gets a high-gloss metallic blue epoxy, and a run of deep navy base cabinets with a stainless top anchors the back wall under a backlit "GARAGE" sign. Tools live on the left wall, sports gear on the right, and a sculptural fiddle-leaf fig replaces the sad corner that every garage seems to grow on its own. The whole room reads as one considered surface rather than a collection of accidents.
Here is what the plan would tell you before you commit. Slatwall is only as good as what it is screwed into — on a block wall you want panels lagged into the mortar joints or mounted on furring strips, not just construction-adhesive and hope, because a loaded panel of hand tools is heavy. The metallic epoxy is the bigger decision: a true metallic system from a line like Rust-Oleum RockSolid or a polyaspartic topcoat needs a ground-and-etched slab and a moisture test first, or it lifts. In a Hudson Valley garage with no slab vapor barrier — common in anything built before the 1990s — I always test for moisture before quoting an epoxy, because a beautiful blue floor that delaminates in two winters is the most expensive shortcut in this whole list.
Color Palette
Brilliant White
#F2F4F6
A cool near-white close to Benjamin Moore Decorator's White CC-20 — bright enough to bounce light around a block shell without reading clinical.
Cobalt Gleam
#1E5AA8
A high-gloss metallic epoxy in the Rust-Oleum RockSolid blue family — the pigment swirl gives the floor visual depth that flat coatings never reach.
Deep Marina
#0B3C6E
Rich navy cabinet fronts in the spirit of Benjamin Moore Hale Navy HC-154, contrasting crisply against the stainless worktop.
Raw Beam
#5D3F1E
Exposed joists left in their natural tone, adding warmth and structural honesty overhead so the room is not all hard surfaces.
2. The Warm Workshop: Pine and Labels
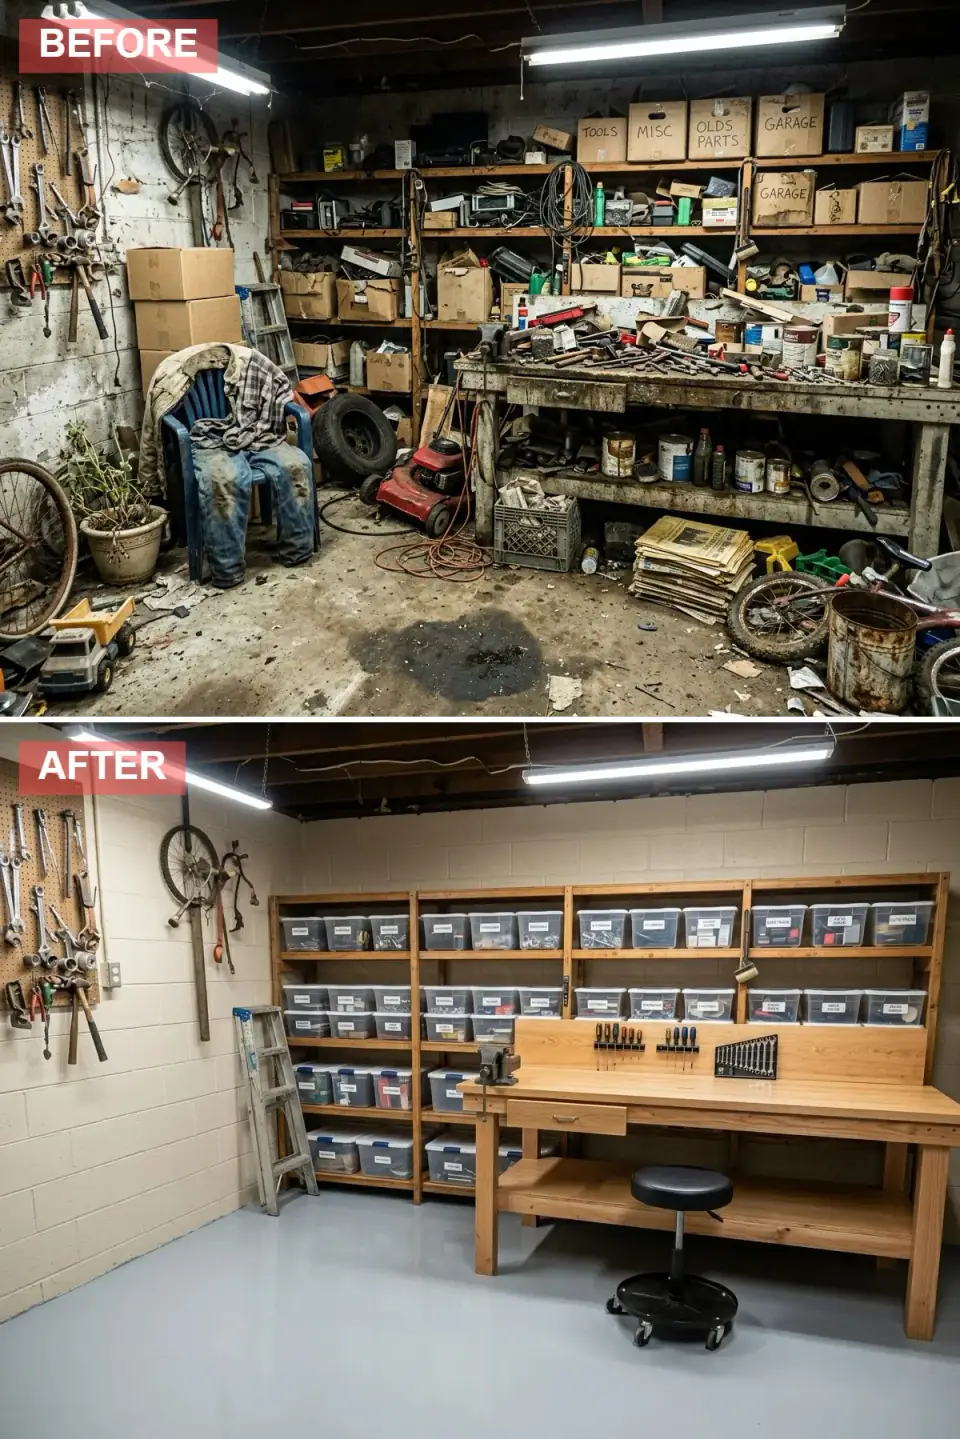
This is the version I send most homeowners to first, because it is the most achievable on a real weekend budget. The block walls get a warm cream, the chaos of mystery boxes gives way to uniform pine shelving, and every loose screw lands in a labeled clear bin so the inventory becomes something you can read at a glance. A solid pine bench with a single utility drawer and a rolling stool does the work, the slab gets a clean light-gray coating, and the original pegboard and ladder are cleaned and kept — a nod to the room's working history.
The plan-literate move here is humility about the shell. You are not fighting the block; you are warming it. Masonry needs a dedicated primer — a high-alkali block filler like Sherwin-Williams Loxon or PrepRite before topcoat — or the paint chalks off within a season. Natural pine shelving is honest and cheap, but pine is soft, so I size the bench top for the actual load: a 2x pine top is fine for hand-tool assembly, not for a bench vise and a hammer. If you keep the existing pegboard, re-hang tools by function, not by what fits — the goal is that your hand goes to the same place every time, which is exactly the muscle-memory logic a good kitchen layout follows.
Color Palette
Warm Parchment
#EDE8D0
A soft off-white near Benjamin Moore Manchester Tan HC-81, warming the industrial shell without tipping into yellow under shop lighting.
Natural Ash Pine
#D8C49C
Light natural pine on shelving and bench, finished with a clear matte poly so it keeps its handmade warmth and wipes clean.
Pale Cement
#B8BCC4
A muted light-gray floor coating that hides dust between cleanings while still bouncing overhead light back into the room.
Transparent Frost
#E0E4E8
Clear bins with white lids for instant visual inventory — buy one model in bulk so the whole wall stacks and reads as a system.
3. The Industrial Lab: Steel and Icons
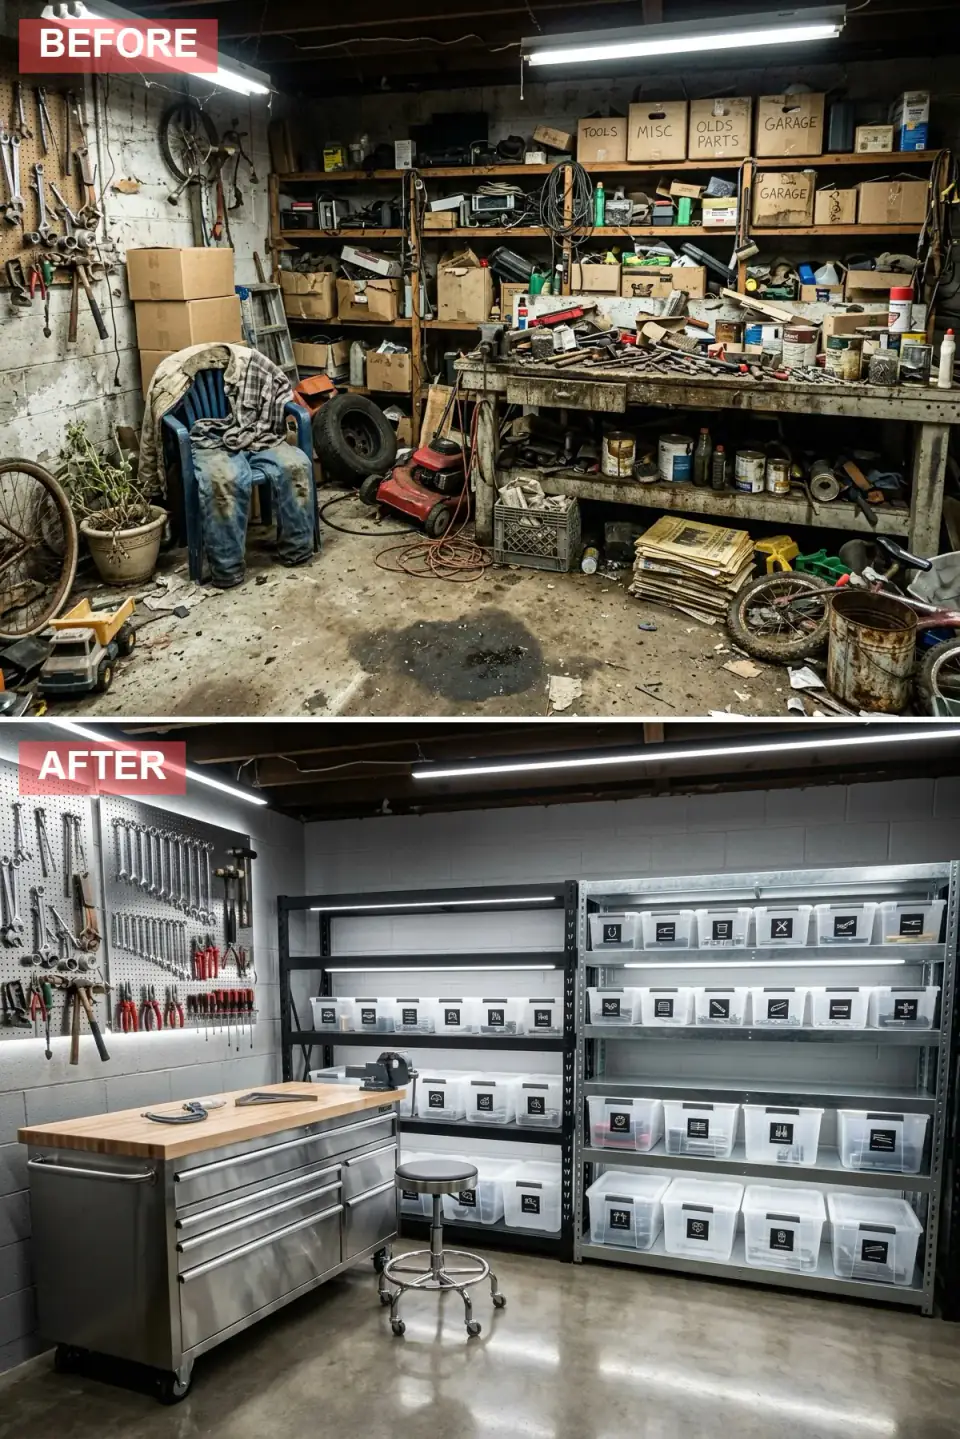
This room goes cool and monochromatic. Medium-gray walls, a polished concrete floor with a faint metallic sheen, and black powder-coated steel shelving that gets underlit so utilitarian storage turns into a lit display case. The centerpiece is a rolling stainless tool chest crowned with a thick butcher-block top — mobility plus a work surface you can actually cut and clamp on. Tools march across a perforated metal pegboard, and a chrome stool keeps the whole thing reading clinical and precise.
Polishing existing concrete instead of coating it is the smart call when the slab is sound — you keep the industrial read and lose the delamination risk entirely, because there is no film to lift. But it only works if the slab is in good shape; a cracked or spalled floor wants a self-leveling overlay first, which is a real line item. The underlit shelving is the detail people underestimate: LED strip under each shelf needs a low-voltage run and a driver, so plan the circuit before the shelves go up rather than fishing wire afterward. If you are weighing a full purpose-built shop, the contemporary two-car garage plan with shed roof and workshop storage shows how this same steel-and-light vocabulary reads when it is designed in from the framing stage rather than retrofitted.
Color Palette
Polished Pewter
#7A7D82
A mid-tone wall gray near Sherwin-Williams Dovetail SW 7018 — a neutral, shadow-free backdrop that lets metal finishes do the talking.
Brushed Silver
#A8AAAD
Reflective stainless on the tool chest and hardware — chosen for durability and a surface that wipes clean of oil and swarf.
Powder Coat
#1A1A1A
Deep matte black on shelving frames and labels for graphic contrast and a coating that shrugs off scuffs.
Raw Mica
#9E9689
Sealed concrete with a subtle mica sheen that diffuses light and resists staining without a film that can peel.
4. The Pro-Grade Corner: Dark and Purposeful
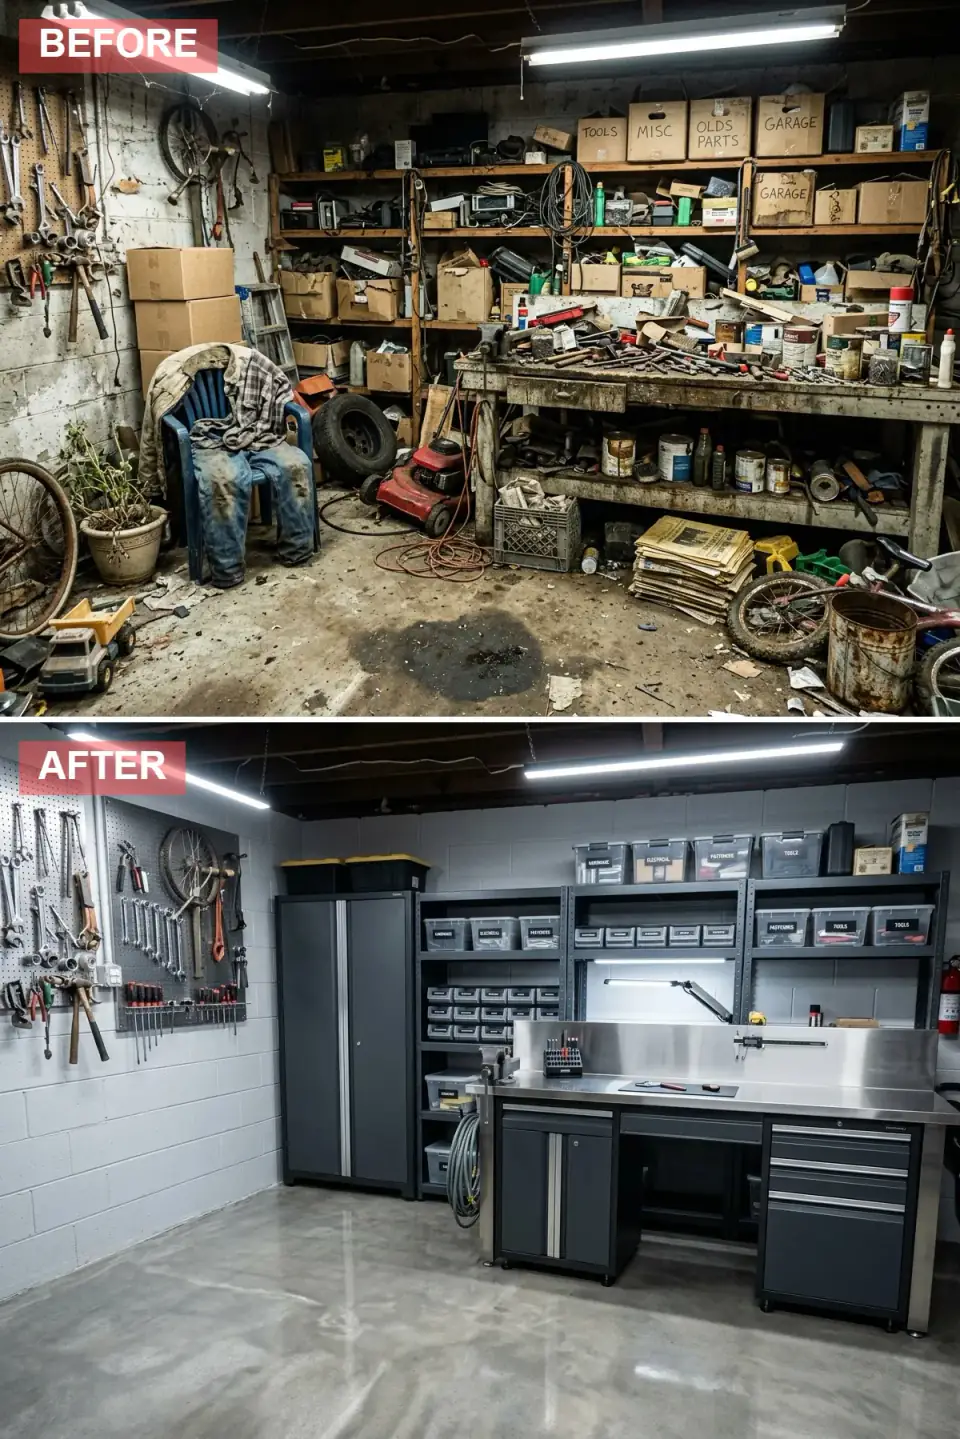
This corner leans full dealership service bay. Dark gray cabinetry and heavy-duty storage sit against freshly painted light-gray block, and the original pegboard now has a sibling — two boards, both curated with hand tools instead of random hooks. Sagging shelves give way to robust dark metal units with small-parts drawers and a tall locking cabinet for chemicals. The bench gets a stainless top with a built-in vise, flanked by matching base cabinets, and a metallic epoxy floor reflects upgraded fluorescents while a task lamp kills shadow on detail work.
The discipline I respect here is the tiered storage logic: open shelving for bulk, clear bins for medium parts, closed drawers for small hardware, and a locking cabinet for anything that should not be open to a curious kid. That last one is not decoration — it is the right place for paint, solvents, and two-stroke fuel, and code-minded storage of flammables is exactly the kind of thing a thoughtful plan accounts for. The built-in vise is the tell that this is a real shop; bolting a vise to a stainless top means blocking the substructure underneath so the bench does not flex when you lean on it. If you are thinking about scale rather than a corner, the 1,200-square-foot garage plan review breaks down how much bench and bay you actually get at that footprint.
Color Palette
Gunmetal Gray
#3A3D42
Dark gray on cabinets and shelving — near Benjamin Moore Kendall Charcoal HC-166 — hiding grease and giving the bay a uniform, professional read.
Masonry Mist
#C5C9CE
Soft light gray on the block to brighten a cave-like before state without throwing glare back at task lighting.
Anodized Silver
#B0B3B8
Brushed stainless bench top that tolerates heavy use and wipes clean of oil and grime.
Smoked Pearl
#8E9095
A metallic-infused taupe-gray epoxy that masks dirt while reflecting overhead shop lights for shadow-free work.
5. The Tech Lab: Electronics and Order
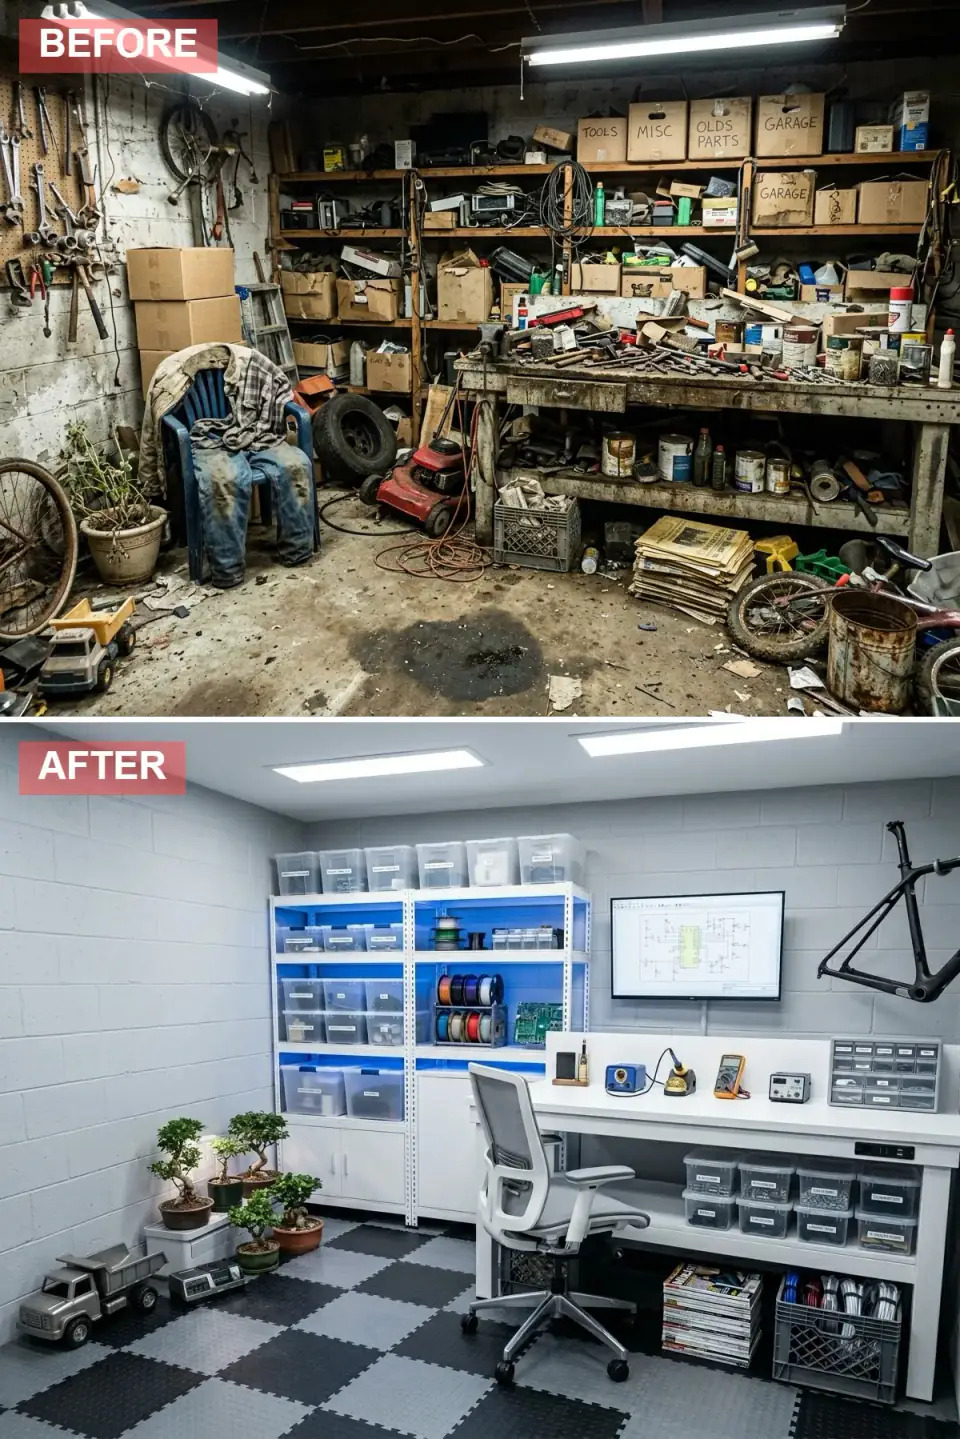
This reinvention drops the garage vocabulary entirely and becomes a bright electronics lab and design studio. The ceiling is closed up with white drywall and recessed LED panels, banishing the dark-cave feeling, the walls go a clean gray-white, and interlocking foam tiles cushion long hours at the bench. A sleek white desk with an ergonomic chair carries soldering stations, a multimeter, and a wall-mounted schematic monitor, while backlit shelving with blue LED accents displays component bins like a museum case. Bonsai, a vintage toy truck, and a mounted bike frame signal a creator's retreat, not a mechanic's pit.
Closing up the ceiling is the move that changes everything here, and it is also the one with consequences. Drywalling over open joists in a garage means thinking about the fire-rated assembly between the garage and any living space above it — Type X gypsum exists for exactly this reason, and it is not where I cut corners. Once the ceiling is sealed and you are running recessed cans and a desk full of electronics, you have effectively converted the room toward conditioned space, which raises insulation and possibly a heat source as the next honest question. This is the makeover that most quietly turns a garage into a room, and the plan should follow it there rather than pretend it is still a garage.
Color Palette
Clinical White
#F7F9FA
A crisp white near Sherwin-Williams Pure White SW 7005 on ceiling, desk, and shelving to maximize brightness for close work.
Deep Graphite
#2B2D2F
Dark charcoal interlocking foam tile that gives anti-fatigue comfort underfoot and grounds the bright palette.
Cyan Glow
#007ACC
Vibrant blue backlighting inside the shelving that adds energy and turns component storage into a focal point.
Cool Silver
#AEB2B6
Neutral gray on the chair and monitor frame, softening the high-contrast black-and-white scheme.
6. The Heritage Workshop: Rustic Industrial Charm
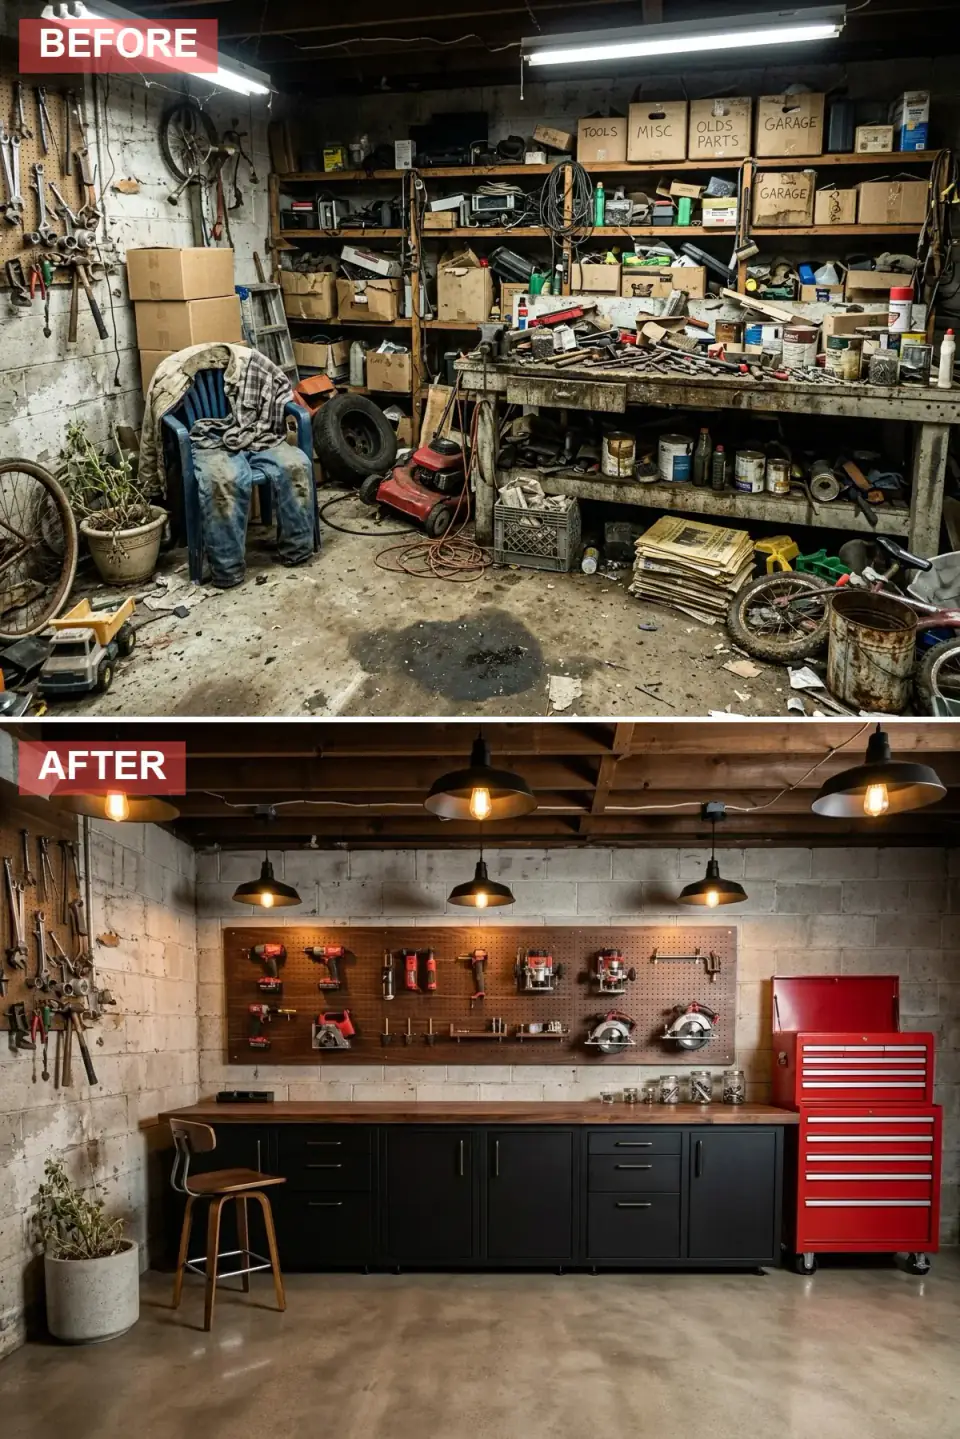
My personal favorite of the six, because it keeps the garage's raw soul instead of erasing it. The cinder block and pegboard stay exposed and simply cleaned, honoring the room's history. Overhead, the joists remain but get dramatized by oversized black industrial pendants with glowing Edison bulbs plus warm string lights. A long run of matte black lower cabinets carries a rich dark walnut counter, power tools become wall art on a stained-wood pegboard, and a classic red rolling tool chest drops in a hit of mechanic-culture nostalgia. The slab is sealed concrete in a warm amber tone — it feels like a vintage motorcycle shop reborn.
This is the cheapest transformation to fake badly and the most rewarding to do right. The trick is restraint: power-wash and seal the block rather than skim-coating it, so you keep the texture that gives the room its age. Edison pendants look the part but throw very little usable light, so I always pair them with hidden task lighting under the cabinets — atmosphere overhead, real lumens where your hands are. The walnut counter is the splurge worth making; a butcher-block walnut top sealed with a hardwax oil like Rubio Monocoat ages into the room instead of looking new forever. Keep the original pegboard and you have done the most plan-literate thing on this whole list: you let the room tell you what it already was.
Color Palette
Dark Timber
#4A332A
Rich walnut butcher block sealed with Rubio Monocoat, bringing organic warmth and a traditional woodworking feel.
Midnight Cabinet
#181818
Deep matte black on base cabinets and pendant shades — near Benjamin Moore Black Beauty 2128-10 — for a moody industrial anchor.
Mechanic Crimson
#C41E3A
The iconic bright red of the rolling tool chest, working as a single nostalgic focal accent against all that black and wood.
Warm Stone
#9C8B73
A warm-tinted sealed concrete floor that complements the wood tones and softens the raw block walls.
Pro Tips From the Renovation Designer's Chair
- Empty the room before you design it. You cannot read the slab, the joists, or the panel under a decade of clutter. Clear it completely, then decide the layout against the bare architecture.
- Decide the single function first. Showroom, mechanic's bay, or maker's studio — pick one and let it drive the materials. A garage that tries to be everything ends up being storage again.
- Light before you organize. A brighter room instantly feels larger and lets you actually see what you are storing. Upgrade fixtures and add task lighting before you buy a single cabinet.
- Match the floor to your tolerance, not the trend. Epoxy and polyaspartic for chemical resistance, foam tile for standing comfort, polished or sealed concrete for honest durability. The right answer depends on how you use the room.
- Sequence the wiring ahead of the storage. Underlit shelves, LED strips, and a real bench circuit want to be planned before the walls fill up — retrofitting wire behind mounted steel means taking it all back down.
- Keep one original element. An old pegboard, a vintage vise, a stretch of raw block — one honest survivor gives the new design a sense of place that a catalog full of new gear never will.
Cost-Saving Moves
- DIY the floor, hire the prep test. A two-car epoxy kit runs roughly $300–$700 in materials, versus $1,800–$3,500 for a pro polyaspartic install in the Hudson Valley. Doing it yourself is reasonable — but pay for a moisture test first so you are not recoating a failed slab.
- Buy slatwall by the panel, not the system. Bulk slatwall plus generic hooks costs a fraction of a branded modular wall and looks identical once loaded. Spend the saving on the cabinets people actually touch.
- Standardize bins early. One bin model bought in bulk is cheaper per unit and never needs replacing for fit — the mixed-brand route quietly costs more over two or three top-up trips.
- Reuse the bones. A power-washed pegboard, a re-topped old bench, and existing shelving brackets carry most of a heritage or warm-workshop look for almost nothing. The block wall you already own is the most expensive surface you will never have to buy.
Reader Questions on Garage Transformations
Is epoxy or polyaspartic better for a garage floor in a cold climate?
In the Northeast I lean polyaspartic for anything I want to last. It cures faster, tolerates lower application temperatures, and resists the hot-tire pickup and road salt that wreck a basic epoxy through a Hudson Valley winter. Epoxy is cheaper and fine for a low-traffic hobby bay, but on an older slab with no vapor barrier, moisture is the real enemy — both systems lift if the slab is wicking water. Whichever you choose, the floor only lasts as long as the prep: grinding, etching, and a moisture test come before the color decision.
Can I finish my garage ceiling and walls like a regular room?
You can, but the moment a garage shares a wall or ceiling with living space, fire separation becomes code, not preference — typically 5/8-inch Type X gypsum on the shared assembly. Once it is closed up and lit, you have effectively pushed the room toward conditioned space, which raises insulation and heating as the next questions. None of that is a reason not to do it; it is a reason to plan it properly. Check with your local building department before drywalling, because the inspector has the final say on the rated assembly.
How much does a full garage makeover cost in 2026?
It spans a wide range. A warm-workshop refresh — paint, DIY floor coating, pine shelving, bins, and a kept pegboard — can land under $2,000 in materials on a weekend or two. A pro-grade build with polyaspartic flooring, modular steel cabinetry, a stainless bench, and added circuits runs $8,000–$20,000 in the Hudson Valley depending on size and electrical work. The single biggest swing is the floor and any electrical upgrade, so price those two first; the storage and finishes scale to whatever budget is left.
What is the right order of operations for a garage renovation?
Empty the room completely, then handle anything structural or hidden first: slab repair, electrical, and any ceiling or insulation work. Paint the walls and ceiling next, while the floor is still bare and overspray does not matter. Coat or seal the floor after the paint, and give it the full cure time the product specifies. Storage and cabinetry go in last, once the surfaces are done and the wiring for any lit shelving is already in the wall. Working in that sequence keeps you from sanding dust onto a fresh floor or fishing wire behind mounted steel.
Should I keep my old pegboard and tools or start fresh?
Keep them, almost always. A power-washed pegboard and a re-organized tool collection cost nothing and carry the working character that makes a garage feel real rather than staged. Rehang tools by function so your hand returns to the same place every time, and treat the few genuinely worn-out pieces as the only things worth replacing. The heritage workshop in this set is built almost entirely on retained elements — that is exactly why it reads as authentic instead of like a showroom that has never seen a project.
Where to Read Next
If converting the garage has you eyeing other under-used square footage, my walkthrough of stylish home gym design ideas and costs applies the same function-first logic to a workout bay, and six basement transformations from drab to fab shows how the moisture-and-light reading carries straight downstairs to the other big slab room in the house.
Sources & Further Reading
- This Old House — Garage renovation and organization guides.
- Family Handyman — Garage storage and workshop layout ideas.
- Bob Vila — Epoxy vs. polyaspartic garage floor coatings.
- International Code Council — IRC R302.6 garage fire separation requirements.
- Sherwin-Williams — Loxon masonry primer and concrete coating specifications.
- Rust-Oleum — RockSolid metallic and polyaspartic floor system data.
- Rubio Monocoat — Hardwax oil finish guidance for butcher-block surfaces.
- NAHB — Remodeling cost and value reference data.
- U.S. Department of Energy — Insulation guidance for conditioning attached garages.

Nora Whitfield
Renovation Designer & Interiors Editor · Beacon, New YorkNine years of design-build renovation work across the Hudson Valley and the Northeast. Nora runs the Renovations, Room Guides and Renovation Mind desks — before-and-after studies, room-by-room design guides, and the long essays on why what we renovate matters.
More from Nora →


Reader notes