


The first thing I look for when I walk into a bathroom that someone is calling "quiet luxury" is the joinery. Whether the marble veining continues across two adjacent slabs. Whether the medicine cabinet is recessed flush with the plaster, or stuck on the wall like an afterthought. How the wall-mounted faucet meets the stone splash — does it land in the field of the slab, or right on the seam where the fabricator was sloppy. After seven years of running renovation design out of the Hudson Valley — Beacon farmhouses, Rhinebeck Colonials, Kingston millhouses, the occasional Brooklyn brownstone — I've come to believe that "quiet luxury" is almost never about the price of the material. It is about how early in the renovation those material decisions were made, and whether the original floor plan had room for them. This guide walks through ten bathrooms that earn the aesthetic, breaks down what each costs at real Northeast labor rates, and explains the framing-stage decisions that make the look possible. It also pulls back to show you the brand-by-brand material hierarchy I actually use when I write a spec.
What's Inside This Guide
- Ten bathrooms that earn the aesthetic — with the structural moves, real cost ranges, and material specs behind each one.
- The five framing-stage decisions every quiet luxury bath shares — and why retrofitting them later doubles the cost.
- A full material hierarchy: faucet tiers, stone sources, plaster brands, recessed cabinet specs, and the cabinet shops I'd actually call.
- A renovation timeline that shows when each decision has to be made — design phase, framing, rough-in, finish — to keep the look intact and the budget honest.
- Cost-saving moves that don't read as cuts, plus the spec details I tell clients to avoid completely.
Why Quiet Luxury Is Actually Hard to Get Right
The aesthetic looks deceptively easy in photographs. Honed stone, plaster walls, a wood vanity, brass fixtures, no clutter. The problem is that 90% of the bathrooms I get called in to evaluate after a renovation have all of those ingredients and still don't read as luxury — they read as expensive minimalism that didn't quite land. The difference, almost always, is structural integration. The countertop sits on a vanity instead of becoming the vanity. The medicine cabinet is surface-mounted instead of recessed. The faucet is deck-mounted instead of wall-mounted, which means the countertop is broken by a hole and a base plate where the silence should have been. Each of those compromises is a finish-stage decision, and each of them was cheaper to choose at framing.
The other reason this aesthetic is hard is that material quality is unforgiving. Standard porcelain tile reads as standard porcelain tile next to honed Calacatta. Engineered quartz is fine in most kitchens but never quite reads as luxury in a small bathroom because the pattern is too regular. Builder-grade brushed nickel ages into a slightly yellowish chrome; real solid brass ages into a warm patina. The aesthetic only forgives material if you stay coherent — three or four honest materials, not seven competing ones. As a renovation designer, my first job on a quiet luxury project is usually to subtract — talk the homeowner out of the third stone, the contrasting tile niche, the patterned floor — and protect the discipline of the room.
Quiet luxury isn't a style. It's a constraint, applied early enough in the project to be free, and applied with enough conviction to actually mean something.
The Five Structural Moves Every Quiet Luxury Bath Shares
Before we walk through specific bathrooms, here are the five plan-stage decisions I see across every project that lands. If you can get four of these into your drawings before framing, the room will read correctly even if you make compromises on finishes. Skip three or more and no amount of expensive stone will save it.
- Recessed storage. Medicine cabinets, niches, and shower shelves all built into the wall cavity rather than projecting into the room. This is the single highest-leverage move and the one that requires the earliest framing decisions.
- Wall-mounted plumbing. Faucets, toilet, sometimes the tub filler. This requires precise rough-in coordinates set by the stone shop drawings before drywall closes — a rough-in is much cheaper to locate correctly than to relocate.
- Integrated sinks. Either a single block of stone with a fabricated ramp basin, or a solid surface (Corian, Hi-Macs) pour with no joint between counter and bowl. The drop-in basin is the dead giveaway of a builder bathroom.
- Floating elements. Vanities and benches anchored to a steel ledger plate buried in the wall. The visual lightness reads as luxury; the engineering behind the lightness is real.
- Layered lighting. No reliance on overhead recessed cans. Sconces at face height, hidden LED accent under floating elements or in niches, plus a low-output ceiling layer. Each layer on its own dimmer.
1. The Integrated Marble Block Vanity
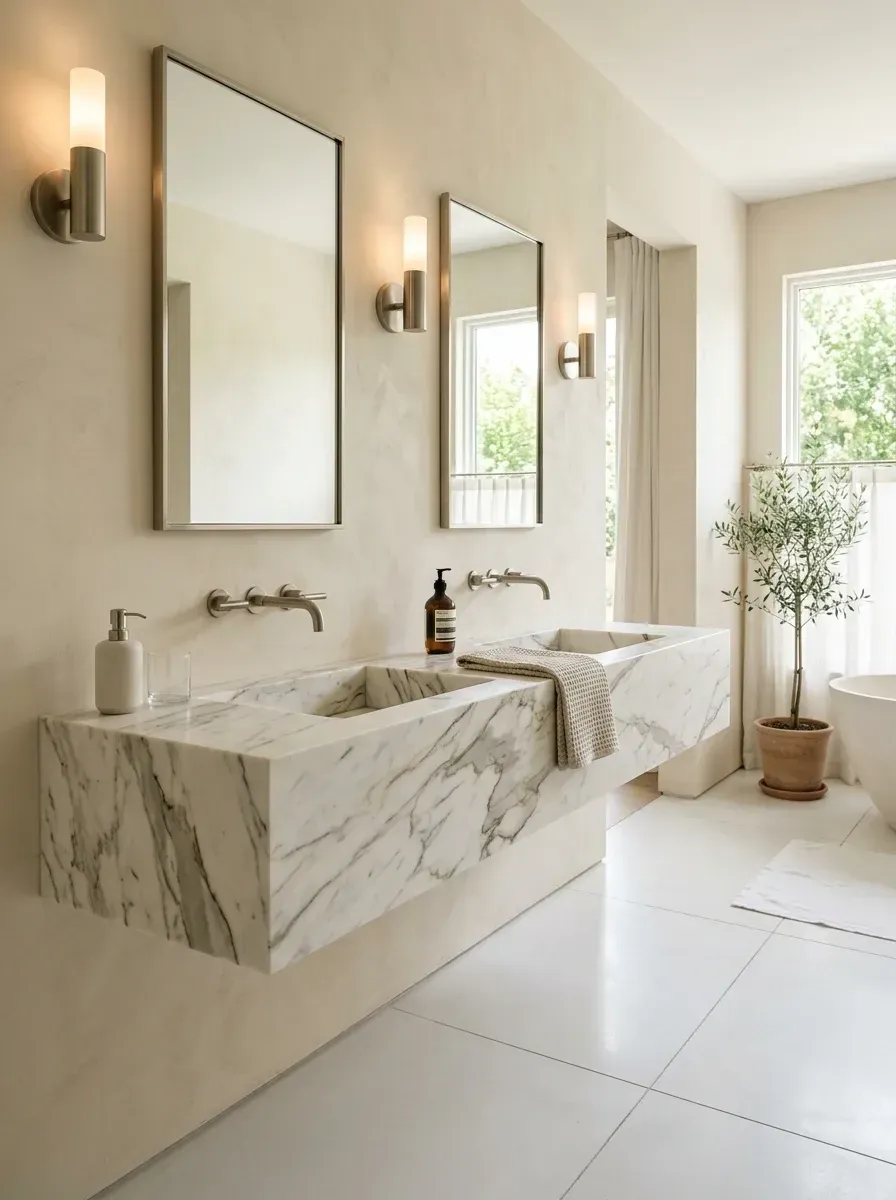
This bathroom treats the vanity as architecture rather than furniture, which is the foundational move of the aesthetic. The Calacatta-style marble is fabricated as one continuous block with two integrated ramp sinks — meaning the basin floor pitches gradually toward a slot drain rather than dropping into a separate bowl. That eliminates the drop-in joint and the silicone bead that would otherwise break the slab. The walls are finished in lime plaster, which is the wall finish that absorbs light most beautifully in this aesthetic; you read it as fabric rather than paint. Brushed nickel wall-mounted faucets keep the countertop completely clear, and that emptiness is what allows the stone to do its real work.
The plan move here is the wall behind the vanity. The valves are buried inside it, the drain is set into the floor specifically to serve a 30mm slot rather than a deck pop-up, and the rough-in coordinates were taken directly from the stone fabricator's shop drawings, not from a generic plumbing template. If a plumber rough-ins from the template, the valve will be 1/2 inch off and the stone splash will end with a visible escutcheon ring sitting half on the slab and half on the plaster. That is the kind of mistake you cannot fix once the slab is set. On the project budget, this room reads as a primary bathroom in the $20–28K finish range, with the marble vanity and plaster walls absorbing close to 60% of the spend.
Features
- Custom integrated Calacatta marble double sink with slot drain
- Textured lime plaster walls in warm cream
- Wall-mounted brushed nickel faucets (Vola or Watermark grade)
- Minimalist cylinder pendant sconces on either side of the mirror
- Large format matte porcelain floor tile, 24x48 with 1/16" grout joint
- Hidden brass slot drain under stone ramp
Cost Analysis
| Decor Item (Qty) | Total Price Range |
|---|---|
| Custom Fabricated Integrated Marble Vanity (6 ft, slab + fab + install) | $6,000 - $10,000 |
| Lime Plaster Wall Finish (Material + Labor, full bath) | $2,500 - $4,500 |
| Wall-Mounted Faucet Sets (x2, Vola FS or similar high-end) | $1,600 - $3,000 |
| Minimalist Cylinder Sconces (x3) | $900 - $1,800 |
| Metal Frame Mirrors (x2, custom or designer retail) | $600 - $1,200 |
| Large Format Porcelain Floor Tile (Installed) | $1,500 - $2,500 |
| Concealed Plumbing Rough-In Premium (vs standard) | $800 - $1,500 |
| Total Estimated Cost | $13,900 - $24,500 |
Material Brand Spec — What I'd Actually Write on the Drawings
- Stone: Calacatta Gold or Calacatta Vagli, honed finish, book-matched. Spec the stone slab from a yard you can walk before fabrication; do not let the fabricator pick.
- Plaster: Marmorino Veneziano (true lime) for the budget; Portola Paints Roman Clay as the practical equivalent.
- Faucets: Vola FS-1 (designer tier) or Brizo Litze wall-mount (mid-luxury alternative).
- Drain: Infinity Drain or Schluter KERDI-LINE — for the slot type, the proprietary detailing is worth the cost.
- Floor tile: Mosa or Florim large-format porcelain in a warm-grey or off-white matte finish.
Color Palette
Warm Cream Plaster
#ECE6D8
A soft, textured neutral that holds light gently across the day.
Calacatta Marble
#DEDEE0
The dominant material — distinct grey veining on a warm white base.
Brushed Nickel
#ACAAA5
A muted metallic that sits inside the cool grey of the marble veining.
Terracotta/Olive
#9C836D
Earthy tones from a potted olive tree introduce the only warm chord.
Renovation Notes for Similar Spaces
- Integrated stone sinks live or die on fabrication. Ask your stone shop for photos of past ramp-sink installs and confirm they have a five-axis CNC waterjet — pooling water on a hand-routed basin is a callback you'll be making within a year.
- Wall-mounted faucet rough-ins must be located on the framing drawings, not the finish drawings. Once the stone splash is set, there is zero margin to move that valve box.
- Bathroom plaster needs a high-quality matte sealer or microcrystalline wax. Untreated lime plaster will absorb moisture around the vanity zone within the first season of real use.
- Use 24x48 or larger floor tiles with the tightest grout joint your installer can hold (1/16" with rectified edges). The fewer grout lines on the floor, the longer the eye reads the room as monolithic.
- Spec the slot drain at minimum 30mm wide so hair and debris don't immediately catch. Linear drains under 25mm look elegant and clog within six months in a household with anyone who has long hair.
- Light the plaster wall close and obliquely with the sconces. The texture only reads when the light grazes it; flat-on light flattens the wall to look like paint.
2. The Architectural Black Marble Tub
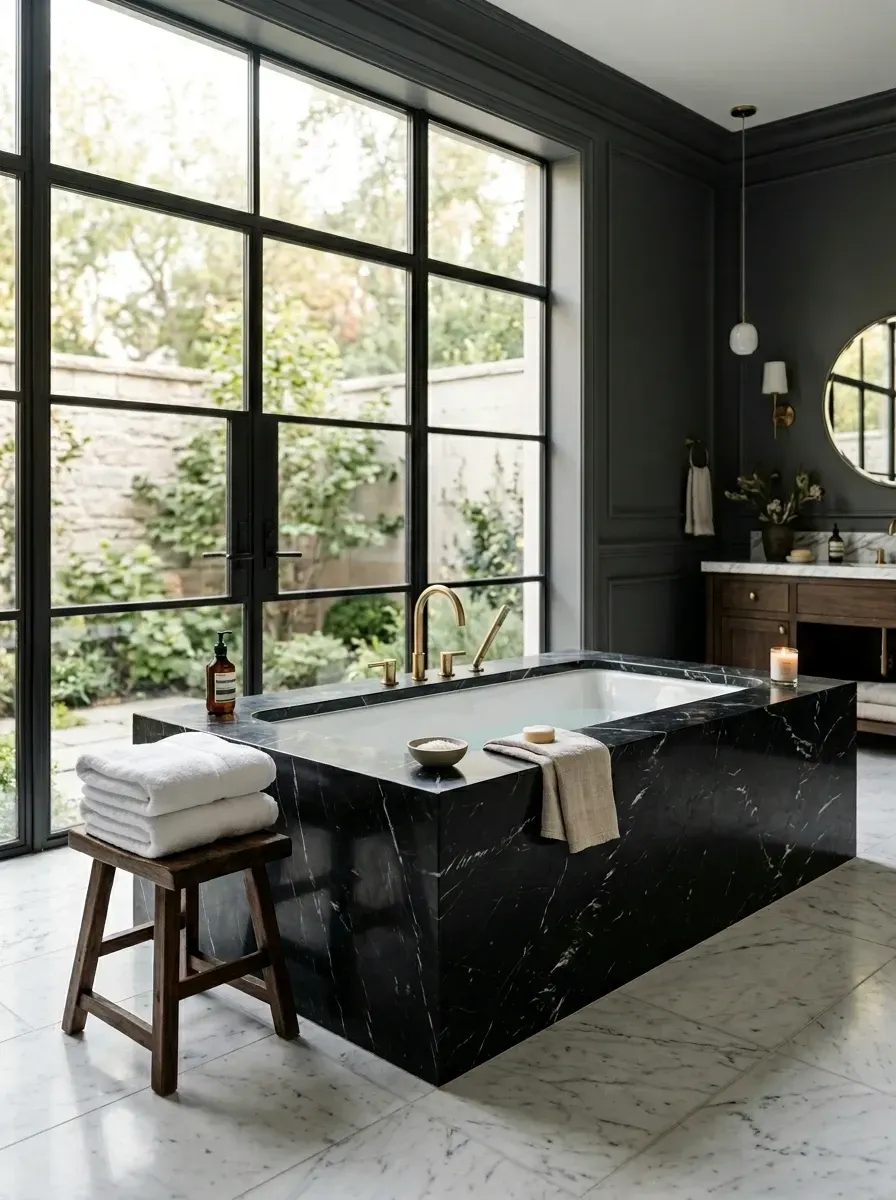
Here the bathtub is the undisputed focal point, clad entirely in Nero Marquina marble so it reads as a carved block rather than a fixture sitting on the floor. The mass of that stone is balanced by a steel-frame window wall — a move I see repeatedly in Hudson Valley weekend-house renovations where there is enough property to put a private courtyard or garden against the primary bath. The dark charcoal molding wraps the room like a frame around a painting. Unlacquered brass adds warmth that pops against the black stone, and will patina over years of use, which is the entire point of specifying it unlacquered in the first place.
Architecturally, this room has to be drawn around the tub. The recessed bathing alcove is the first move on the floor plate — not an addition during construction. The window wall has implications for the building's structural envelope: a steel-frame system this large requires either a structural header (for a load-bearing wall) or a carefully detailed flashing assembly (for a non-load-bearing one). In a Beacon or Rhinebeck farmhouse renovation, where the original 1880s framing was never sized for openings this wide, you usually end up with a new microlam header and a pour of structural concrete in the foundation below the new opening. None of that is finish-stage work. All of it has to be on the structural sheets before demo starts.
Features
- Custom Nero Marquina-clad drop-in soaking tub
- Large-scale steel frame windows and doors (thermally broken)
- Dark painted wainscoting and crown molding
- Carrara marble herringbone floor
- Deck-mounted unlacquered brass tub filler with hand shower
- Floor-mounted brass sconce reading light
Cost Analysis
| Decor Item (Qty) | Total Price Range |
|---|---|
| Custom Nero Marquina Tub Cladding (Slab + Fabrication + Install) | $10,000 - $18,000 |
| Steel Frame Windows & Door System (Thermally Broken, Custom) | $15,000 - $30,000 |
| Structural Header / Engineering for Window Opening | $2,500 - $5,000 |
| Deck-Mounted Brass Tub Filler & Hand Shower (Waterworks Henry) | $1,500 - $3,500 |
| Carrara Marble Herringbone Floor (Installed) | $3,000 - $5,000 |
| Custom Millwork (Wainscoting & Crown) | $4,000 - $7,000 |
| Walnut Vanity (Background, Custom) | $3,000 - $5,000 |
| Total Estimated Cost | $39,000 - $73,500 |
Material Brand Spec
- Stone: Nero Marquina, leathered finish (hides water spots better than honed).
- Steel windows: Crittall Steel Windows or Optimum Window. Both ship to the Northeast; Optimum is faster lead time.
- Tub filler: Waterworks Henry deck-mount in unlacquered brass — the patina pattern is unmatched at this price tier.
- Tub: Cast iron or steel-pan tub clad in stone, not acrylic. Acrylic flexes and cracks the silicone seam between tub and stone within two years.
- Floor: Carrara honed, herringbone-cut at 4x12 or 4x16 modules, set with flat 1/16" joints in matched grout.
Color Palette
Charcoal Grey
#3B3F42
A deep, moody grey on woodwork that frames the room.
Nero Marquina Black
#1A1A1A
Intense black stone with striking white veining.
Aged Brass
#BFA065
Warm metallic that reads as the only living material in the room.
Carrara White
#E8EBEF
Classic white marble flooring keeps the room from collapsing into shadow.
Renovation Notes for Similar Spaces
- Cladding a tub with stone slabs is a three-trade dance: framer, plumber, stone fabricator. Get all three in the same shop drawing review before framing closes, or your access panel will end up on the wrong side of the tub.
- Nero Marquina shows water spots and soap residue more than lighter stones. Plan for daily wipe-down and a quarterly rewax — or specify a leathered finish that hides spotting better than honed.
- Steel-frame windows must be thermally broken in any Northeast climate from Philadelphia north. A non-broken frame will fog and weep condensation through every February.
- Mix your metals on purpose — brass tub filler as the headline, matte black window frames receding into the wall. Two finishes, two roles, no ambiguity.
- If you're working with an older masonry-foundation building (typical Hudson Valley pre-1900 stock), get a structural review before specifying a window wall this size. The opening will likely require footing reinforcement that adds $3K-$8K to the budget.
- Wainscoting in a wet zone has to be moisture-resistant MDF or properly sealed solid stock with a vapor barrier behind it. Standard pine paneling will cup within two heating seasons.
3. Floating Marble and White Oak
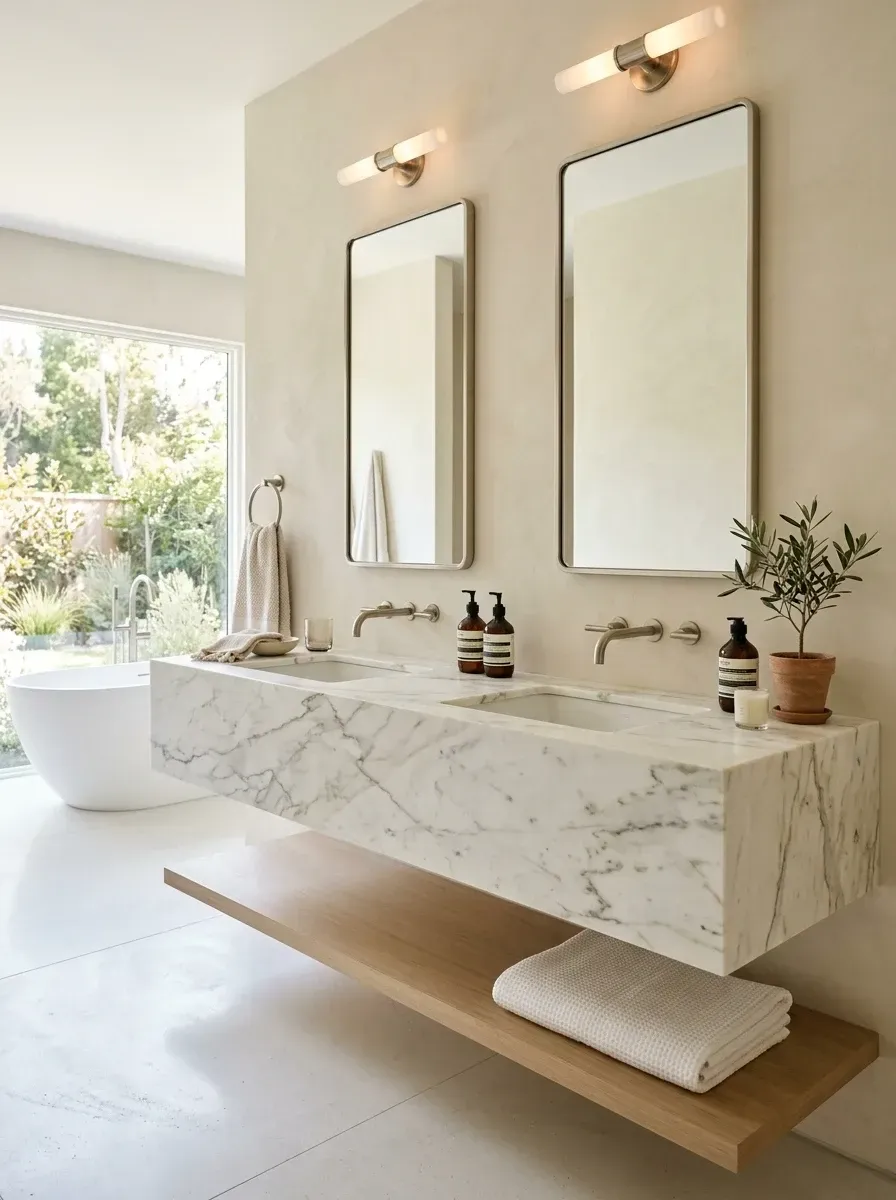
This design uses negative space the way a good house plan uses circulation — as a designed element, not as leftover. A thick slab of Statuario-style marble with integrated sinks appears to float, supported only by the back wall. Below it, a single floating shelf of white oak introduces the warmth that the cool stone alone cannot carry. The poured floor and pale plaster walls keep everything else quiet so the float reads. The detail you don't see — and this is the actual luxury — is the steel ledger plate buried in the wall behind the plaster, carrying the entire weight of that stone slab back to the studs.
A Statuario slab of these dimensions weighs roughly 350–500 pounds. It cannot hang off drywall anchors. The structural answer is a continuous steel angle, lag-screwed into doubled studs at every framing bay, with the stone bonded to it via epoxy and silicone. The framer puts that ledger in. The plasterer hides it. Almost every "how did the stone float" question has the same answer: a ledger plate, decided on the framing drawings, installed before drywall, and never visible again. If the contractor doesn't have a structural detail for that ledger before demo starts, the floating vanity is going to become a mounted vanity — or worse, a mounted vanity with visible support brackets.
Features
- Thick Statuario marble floating countertop with integrated double sinks
- Floating white oak lower shelf for towel storage
- Poured concrete-look or resin (micro-topping) floor
- Wall-mounted brushed nickel faucets
- Curved rectangle mirrors
- Freestanding soaking tub at far end (Victoria + Albert grade)
Cost Analysis
| Decor Item (Qty) | Total Price Range |
|---|---|
| Custom Marble Integrated Sink Countertop (6 ft, Statuario) | $7,000 - $11,000 |
| Custom Floating White Oak Shelf | $1,500 - $3,000 |
| Steel Support Structure for Floating Stone (Hidden) | $1,000 - $2,000 |
| Wall-Mounted Faucet Sets (x2) | $1,200 - $2,400 |
| Poured Concrete/Resin Flooring (Installed) | $3,000 - $6,000 |
| Freestanding Soaking Tub (Victoria + Albert or equivalent) | $2,500 - $5,000 |
| Plaster Wall Finish (Installed) | $2,000 - $3,800 |
| Total Estimated Cost | $18,200 - $33,200 |
Material Brand Spec
- Stone: Statuario or Calacatta Borghini, 1.25" or 2cm honed slab.
- Wood shelf: Rift-sawn white oak, marine-grade poly or Rubio Monocoat 2C in a Smoke or Pure tone.
- Floor: Ardex Pandomo Loft micro-topping or a poured polyurethane like Sika DecoPour.
- Tub: Victoria + Albert Volcanic Limestone (Barcelona or Pescadero), or Kallista Archeo cast iron.
- Faucets: Hansgrohe AXOR Citterio wall-mount (clean modern), or Watermark Loft 2.0 (slightly softer profile).
Color Palette
Oatmeal Plaster
#E3DED1
A very pale, warm neutral wall finish.
Statuario Marble
#F0F0F0
Crisp white marble with bold grey veining.
White Oak Natural
#CBBFA3
Light, natural wood grain bringing warmth to the lower plane.
Pale Concrete Grey
#D6D6D6
A continuous, light grey floor surface.
Renovation Notes for Similar Spaces
- A floating stone vanity of this weight needs an engineered steel bracket system anchored back to a doubled stud or a steel ledger. Talk to your structural engineer before drywall, not after the slab is delivered.
- Open shelving in a bathroom is a curation problem. It only works if you commit to displaying neatly stacked towels and decanted products — clutter kills the entire effect within a week of real-life use.
- Finish the wood shelf with a marine-grade polyurethane or hardwax oil rated for wet locations. Untreated white oak under a sink will gray out and grain-raise within a year.
- Poured resin and micro-topping floors require a perfectly flat substrate — usually a self-leveling underlayment over a stiffened subfloor. A standard joist-spaced bath floor will crack the topping at the joist line within a heating season.
- A freestanding tub paired with floating vanities exaggerates the visual lightness of the room. Keep the floor monolithic — no transitions, no thresholds — to let the float read.
- Ask your stone fabricator to produce a 3D shop drawing showing the ledger interface. If they can't, hire a different fabricator. The ones who do this work daily have the detail in their library.
4. Raw Concrete and Reclaimed Timber
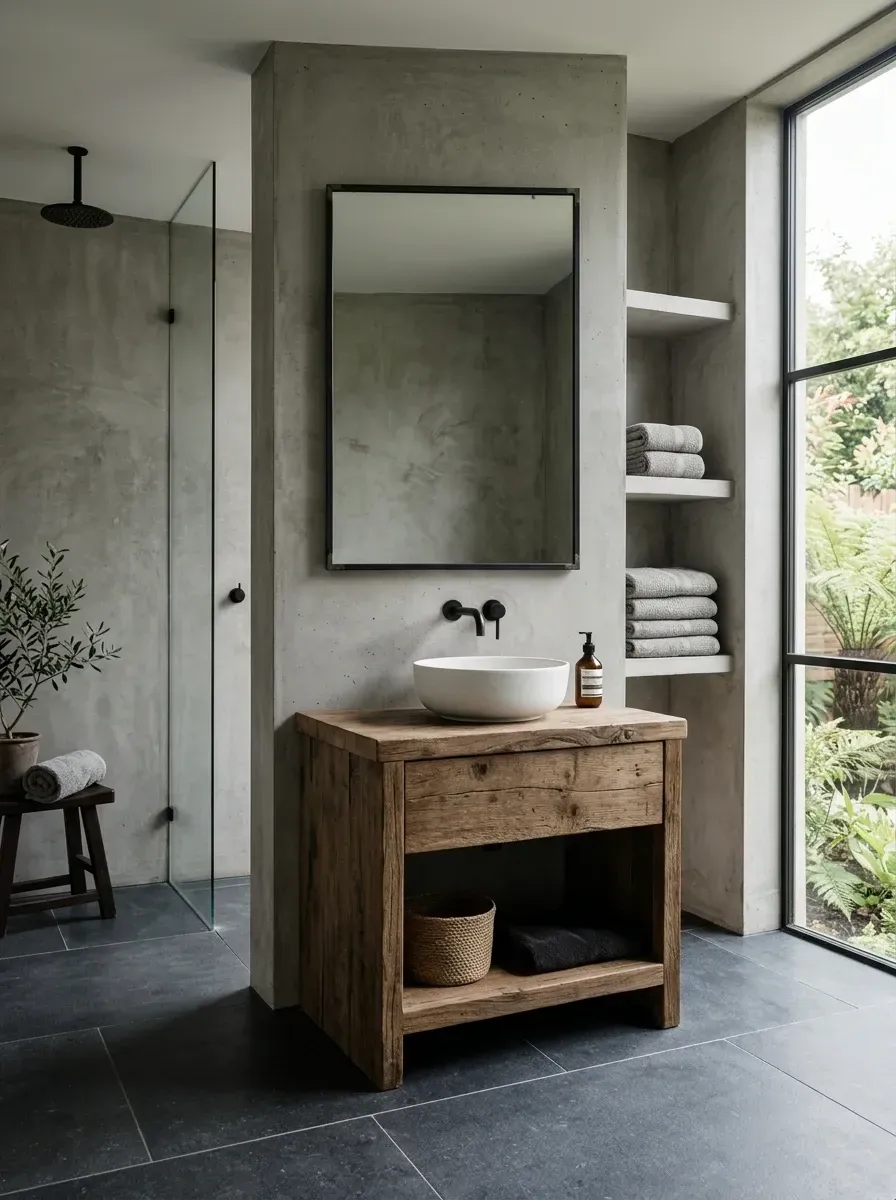
This space leans into the Wabi-Sabi end of the aesthetic — luxury through authenticity rather than polish. The walls are real troweled concrete; the vanity is a single piece of reclaimed timber with the original saw marks left visible. Instead of hiding imperfections, the room frames them. A simple ceramic vessel sink and matte black wall-mounted fixtures supply the modern counterpoint. The combination should not work — three "rough" materials competing — but the discipline of the styling holds it together: one piece of stone, one piece of wood, one set of metal, no styling layered on top.
I see this approach work best in upstate New York renovation projects where the existing building (a converted barn, a restored mill, an old Catskills weekend cottage) already has rough material memory worth honoring rather than papering over. In those projects, the new bathroom needs to be in conversation with the existing structure — concrete walls echo a stone foundation; reclaimed timber echoes original beams; matte black fixtures reference the steel hardware on a barn door. The plan-aware version of this room respects what was already in the house and doesn't try to deliver a Manhattan-loft aesthetic into a Hudson Valley farmhouse. That coherence is what reads as luxury, even when the individual material costs are modest.
Features
- Floor-to-ceiling raw troweled concrete walls and shower partition
- Rustic reclaimed wood vanity console (single slab, exposed grain)
- Round ceramic or stoneware vessel sink
- Matte black wall-mounted faucet and shower system
- Large slate or dark concrete floor tiles
- Frameless glass shower screen, single panel
Cost Analysis
| Decor Item (Qty) | Total Price Range |
|---|---|
| Concrete Wall Finish (Specialty Labor & Material, full bath) | $4,000 - $7,000 |
| Reclaimed Wood Vanity Console (Custom or High-End Retail) | $2,500 - $4,500 |
| Ceramic Vessel Sink | $300 - $700 |
| Matte Black Wall-Mount Faucet & Shower System | $1,200 - $2,500 |
| Large Format Dark Slate Flooring (Installed) | $2,000 - $3,500 |
| Frameless Glass Shower Panel | $800 - $1,500 |
| Decorative P-Trap (Matte Black, Concealed Behind Console) | $150 - $350 |
| Total Estimated Cost | $10,950 - $20,050 |
Material Brand Spec
- Concrete walls: True trowel-on micro-cement (Ideal Work Microtopping or Pandomo) over cement board, sealed with a topical urethane rated for splash zones.
- Wood: Reclaimed white oak or chestnut from a regional supplier (Hudson Company in Pine Plains, NY is the Northeast standard).
- Faucet: Brizo Litze or Kohler Components matte black wall-mount.
- Vessel sink: Stoneware from Heath Ceramics or Native Trails NativeStone — both age more elegantly than glazed white ceramic.
- Floor: Honed Vermont slate (Sheldon Slate) at 24x24, set with matched dark grout.
Color Palette
Raw Concrete Grey
#999999
A medium grey with distinct trowel marks and texture.
Rustic Reclaimed Brown
#8B6D50
Warm, medium-dark wood with heavy grain and tool marks.
Matte Black
#222222
Flat black for faucets, mirror frame, and shower head.
Dark Slate/Concrete
#4A4F55
Deep charcoal flooring that grounds the lighter walls.
Renovation Notes for Similar Spaces
- True concrete walls in a wet zone need a penetrating densifier and then a topical sealer rated for splash exposure. Skip either step and the wall starts spalling at the shower line within two seasons.
- Vessel sinks change your vanity height math. The cabinet has to drop to roughly 30–32 inches so the rim of the bowl lands at a usable 34–36 inches. A standard 36-inch vanity will leave a tall person hunched.
- Reclaimed wood needs the deep grain stabilized — brush off the loose fiber, then seal with a wet-area-rated hardwax or marine poly. Otherwise toothpaste and soap embed in the grain and never come out.
- Bathrooms with this much hard surface need warm color in the lighting (2700K) and at least one organic textile — a Turkish cotton bath sheet, a small reed mat — or the room reads as a parking garage.
- An open console vanity exposes the P-trap. Specify a decorative trap in the same finish as your faucet — matte black trap, matte black faucet — or skip the open console altogether.
- Concrete walls will telegraph cracks if the structure flexes. In an older house with bouncy floors, stiffen the framing with sister joists or LVL ribbon before applying the concrete topcoat — or accept the hairline cracks as part of the aesthetic.
5. The Recessed Marble Niche Tub
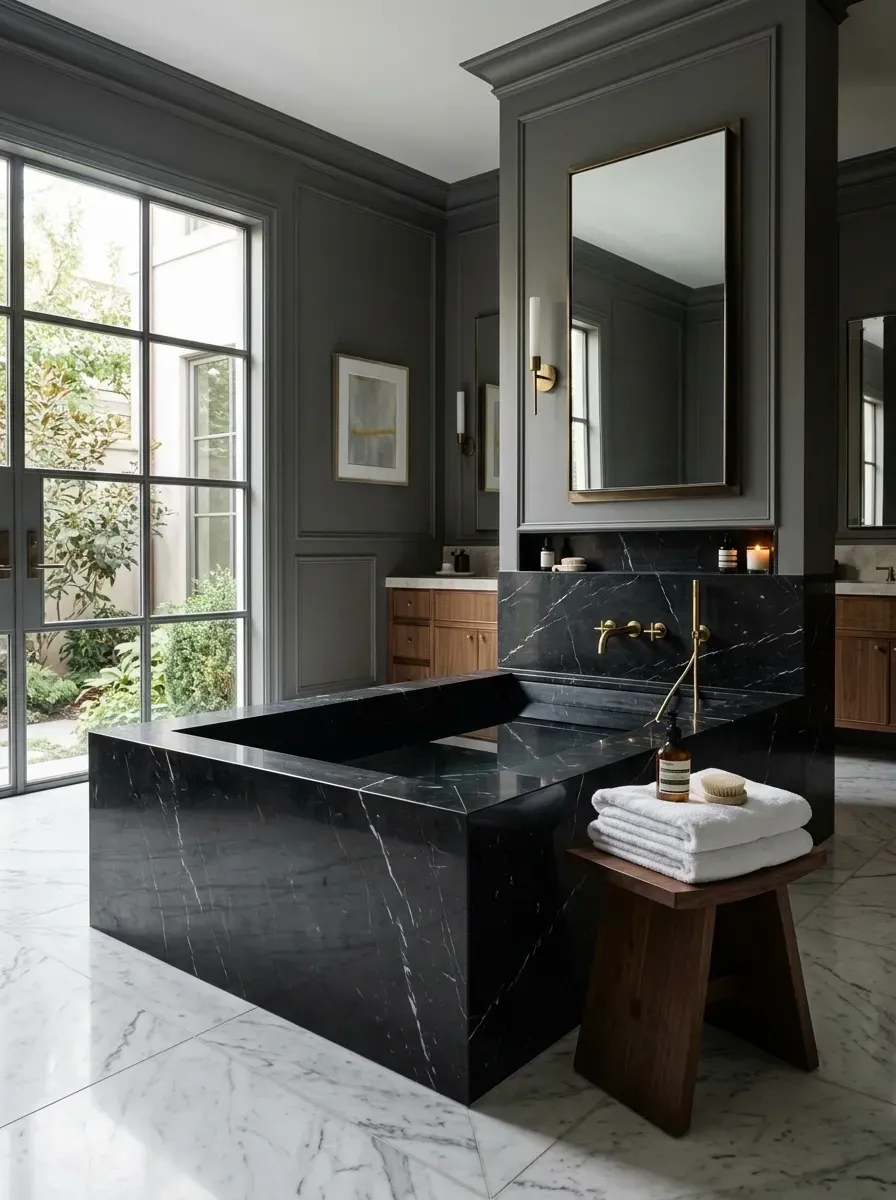
This image shows a structural strategy I push hard on every primary bath I design — the recessed bathing alcove. The black marble tub is set into a deeply recessed niche framed by dark grey molding, which separates the wet zone from the rest of the room and makes the tub feel like part of the building rather than a fixture parked against a wall. The walnut vanity in the background carries the warmth so the dark stone doesn't dominate. On the floor plan, this alcove costs you about 8–10 inches of room depth — but the visual and functional payoff (no splash on the dry side, a contained micro-room) is worth more than the lost square footage in almost every layout I've drawn for an older Northeast house.
The integrated soap niche inside the splash wall is the kind of detail that separates a thoughtful renovation from a quick one. It needs to be pitched at least 1/8 inch per foot toward the tub during stone fabrication so water drains back instead of pooling on the shelf and etching the surface. The pitch has to be in the shop drawing — fabricators won't add it on their own because it complicates the cut. Lighting the niche with a low-output LED on a separate dimmer turns the marble veining into a museum vitrine effect at night. That LED has to be in the electrical plan during rough-in, with the wire stubbed out behind the niche before the stone goes in. None of these are improvisations; they are sequential planning decisions, and each one happens before drywall.
Features
- Built-in black marble tub set into a recessed alcove
- Integrated soap/shampoo niche with hidden LED lighting
- Extensive dark grey wall molding and shadow-box trim
- Brass wall-mounted tub filler and floor-mounted sconce
- Natural walnut vanity cabinetry in the background
- White marble field tile flooring
Cost Analysis
| Decor Item (Qty) | Total Price Range |
|---|---|
| Custom Marble Tub & Niche Fabrication/Install | $12,000 - $20,000 |
| Extensive Custom Wall Molding & Paint Labor | $5,000 - $9,000 |
| Brass Tub Filler & Hand Shower System | $1,500 - $3,000 |
| Brass Sconce Light(s) | $400 - $1,200 |
| Walnut Custom Vanity Cabinetry (approx. 6 ft) | $4,000 - $7,500 |
| Marble Floor Tile Installation | $3,000 - $5,000 |
| LED Niche Lighting + Dimmer | $300 - $700 |
| Total Estimated Cost | $26,200 - $46,400 |
Material Brand Spec
- Stone: Nero Marquina or St Laurent (warmer black with more brown veining).
- Tub filler: Waterworks Henry, Kallista For Loft, or Newport Brass East Square in unlacquered brass.
- Vanity: Custom American walnut from a local mill (in the Hudson Valley, that's typically Hudson Company or Berkshire Brothers); flat-front drawers, push-to-open hardware.
- Wall paint: Farrow & Ball Down Pipe (deeper) or Off-Black for the wainscoting and trim.
- LED: Diode LED Fluid View at 2700K with aluminum diffuser channel.
Color Palette
Dark Charcoal Grey
#45494E
A deep, matte grey defining the architectural envelope.
Black Marble
#1C1C1C
The dominant material for the tub and the wet wall.
Natural Walnut
#9E7B5A
Rich, warm wood that carries the human chord against the dark envelope.
Brushed Brass
#CFA86F
Warm metal acting as jewelry against the dark stone.
Renovation Notes for Similar Spaces
- A recessed tub niche means framing out a false wall. Account for it on the original floor plan — adding it later means moving plumbing stacks and re-permitting in most jurisdictions.
- The integrated soap niche must be pitched during fabrication so water drains back. Confirm the pitch in the stone shop drawing before signing the cut release.
- Pair a dark architectural shell with a warm-wood vanity to keep the room from going funereal. Matte oil finish on the walnut, not high gloss — gloss reads as showroom rather than residence.
- Tuck a low-output LED strip into the top of the marble niche on a separate dimmer. At night it lights the veining like a museum vitrine and saves you from turning on overhead cans.
- If you're working in an older house with skim-coat plaster on the existing walls, the new dark wall paint will telegraph every imperfection. Spec a Level 5 drywall finish on any new sheetrock and feather it carefully into the existing plaster — or accept the texture variation as part of the building's history.
- Run a structural calculation on the floor framing under the alcove. A cast-iron tub clad in stone, full of water, with a person in it can run 800–1,200 pounds. Standard 16" o.c. joists at 12-foot spans will deflect — sister or stiffen as needed.
6. The Rustic Wood Console & Concrete
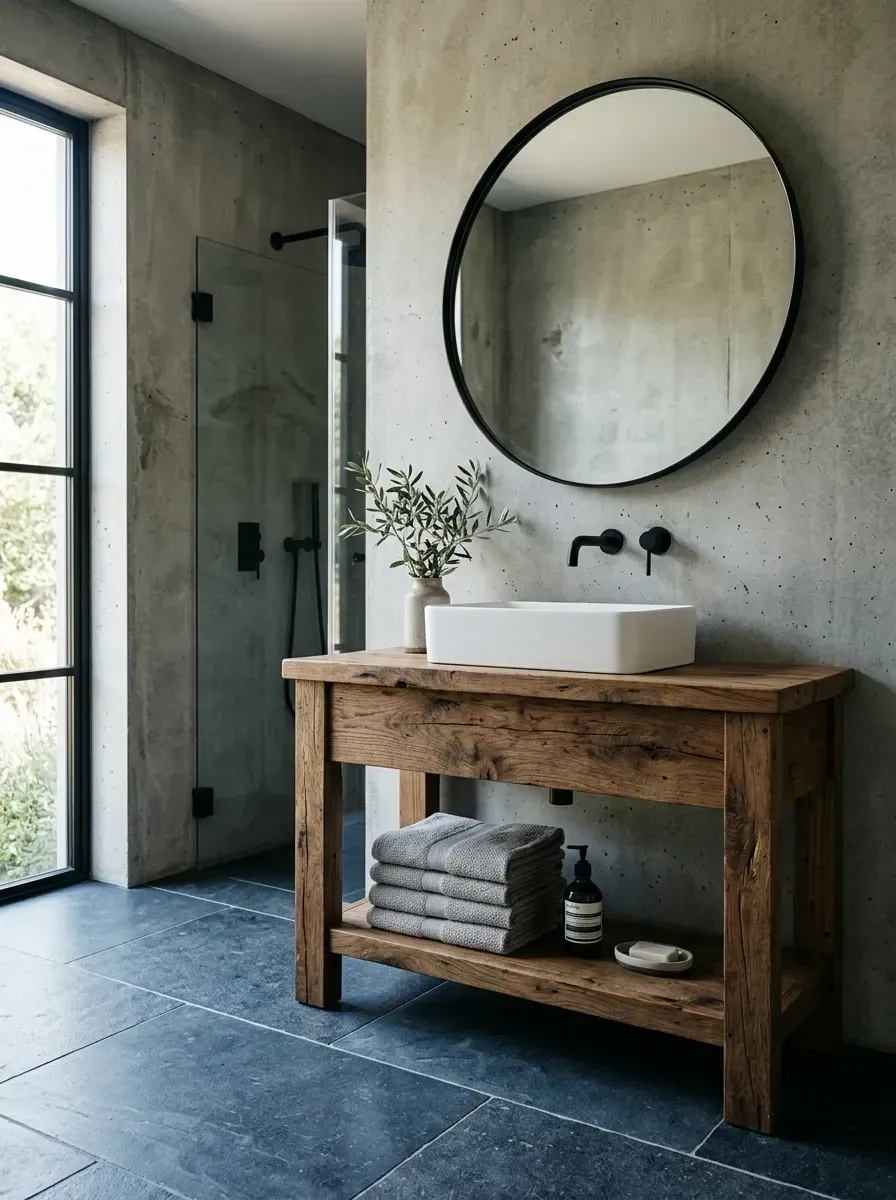
This vignette is a master class in tension. The vanity is an open console of heavily grained, distressed wood; the sink is a cleanly geometric ceramic basin; the wall behind is industrial concrete. None of those materials want to live with each other on paper — but they hold the room together because each is doing one thing honestly. A round black-framed mirror breaks the rectilinear lines of the console and the steel windows behind it. The geometry of the round mirror against the linear paneling and steel frames is the move that gives the eye somewhere to rest.
This is the kind of curated rough-and-refined mix that works particularly well in plan-aware renovations of older homes — a Brooklyn Heights rowhouse parlor bath, a Hartford Colonial Revival wing, a Providence Federal — where pure minimalism would feel imposed and pure rustic would feel sentimental. The discipline is in the editing. Every object earns its place: one wood, one concrete, one stone (the round basin), one metal. The plumber gets a stack of decorative brass fittings on the supply lines because they are visible. The electrician gets sconce locations measured to the inch because the symmetry is doing structural work. There are no throwaway details in a console-vanity bathroom — everything is on display.
Features
- Rustic, distressed wood console vanity table
- Rectangular white ceramic vessel sink
- Exposed troweled concrete walls
- Large round black-framed mirror
- Matte black wall-mounted faucet
- Decorative matte black P-trap and supply lines
Cost Analysis
| Decor Item (Qty) | Total Price Range |
|---|---|
| Rustic Wood Console Vanity (custom or designer retail) | $1,800 - $3,500 |
| Rectangular Ceramic Vessel Sink | $350 - $650 |
| Matte Black Wall-Mount Faucet | $600 - $1,200 |
| Decorative Matte Black Supply Lines + P-Trap Kit | $200 - $450 |
| Large Round Metal Framed Mirror (approx. 40") | $500 - $1,000 |
| Concrete Wall Treatment (Labor & Material) | $3,000 - $5,000 |
| Slate or Dark Stone Flooring | $1,500 - $3,000 |
| Total Estimated Cost | $7,950 - $14,800 |
Material Brand Spec
- Console: Custom from a local mill, or RH Belgian Trestle / James Said Console for retail spec.
- Vessel sink: Lacava or Stone Forest in honed limestone (limestone vessels age more elegantly than glazed ceramic).
- Faucet: Kohler Components matte black or Brizo Litze in matte black wall-mount.
- Decorative P-trap: California Faucets or Watermark exposed-trap kit.
- Mirror: CB2 Infinity or Ren Wil Pacific Heights round mirror, or a custom black-welded steel frame from a local fabricator.
Color Palette
Industrial Concrete
#A8A9A3
Cool grey with visible aggregate and trowel imperfections.
Distressed Oak
#967959
Warm, textured wood with visible knots and grain.
Clean White Ceramic
#F5F5F5
A crisp white element that pops against the muted background.
Matte Black
#1F1F1F
Provides graphic definition against the grey walls.
Renovation Notes for Similar Spaces
- Open console vanities expose the P-trap. Specify a decorative trap in the same finish as your faucet — matte black trap, matte black faucet — instead of standard white PVC, which kills the entire look.
- Vessel sinks splash hard. Pick a wall-mounted faucet with enough spout reach to hit the center of the basin, and mount it just low enough that the water column doesn't break against the rim.
- Don't try to coordinate the wood grain with anything. Let it stand as a singular piece — that's why it works. Matching it to a floor or a stool collapses the contrast.
- Seal the top surface and any horizontal shelf below the basin where wet towels will inevitably land. Marine poly or hardwax oil; reapply every 18–24 months in heavy-use baths.
- Storage is the open-console weakness. Build a recessed cabinet on an adjacent wall, or add a tall narrow cabinet near the door, so the surface of the console can stay empty.
- If you're using a real concrete topcoat (not micro-cement), the wall thickness changes by 1/4" to 3/8" — that has to be reflected in the framing dimensions, the door jamb, and the trim returns. Don't surprise the drywaller with it on day one of finish work.
7. Vertical Paneling and Grey Marble
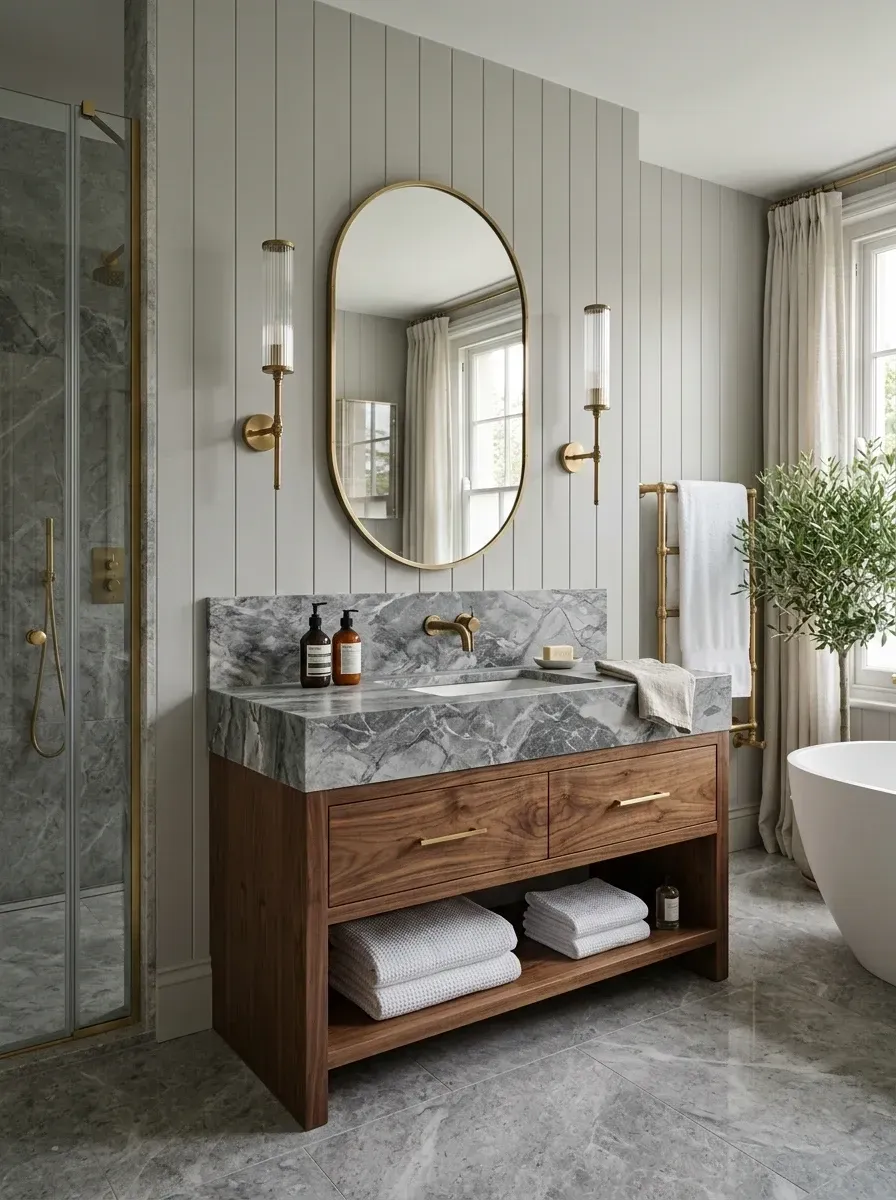
This bathroom uses architectural rhythm rather than color to do the work. The walls are clad in vertical tongue-and-groove paneling in a soft grey, which adds a measured cadence to a room that otherwise has very few lines on it. The grey-and-white marble counter and splash carries all the visual movement, and the walnut vanity grounds it. Slender brass sconces and fixtures add the necessary jewelry without ever raising their voice. The layering of paneling, stone, wood, and metal — four materials, four roles — is the kind of disciplined stack that this aesthetic asks for.
This is a strong template for primary baths in the New England Colonial Revival belt (Hartford, New Haven, Providence, Portland Maine) where the historical envelope wants the tongue-and-groove and the new finishes can borrow its rhythm. The plan-aware version of this room respects the historical wainscoting language — vertical boards, beaded edge, real wood — and uses it as the architectural skeleton, then layers contemporary materials on top. The trick is in the proportions. Wainscoting in a 1900-built Colonial wants to land at chair-rail height (33–36 inches); a contemporary version can run floor-to-ceiling for a more architectural read. Pick one and commit; the in-between heights look indecisive.
Features
- Vertical tongue-and-groove wall paneling, floor to ceiling
- Grey and white heavily veined marble countertop and splash (Bardiglio Imperiale)
- Walnut wood vanity with open bottom shelf
- Elongated brass and glass sconces flanking the mirror
- Brass hydronic towel warmer
- Marble field tile flooring
Cost Analysis
| Decor Item (Qty) | Total Price Range |
|---|---|
| Custom Walnut Vanity with Marble Top & Splash | $5,000 - $8,500 |
| Vertical Wall Paneling Material & Installation | $3,000 - $5,500 |
| Brass Wall-Mount Faucet | $800 - $1,500 |
| Elongated Brass Sconces (x2) | $800 - $1,600 |
| Hydronic or Electric Brass Towel Warmer | $1,000 - $2,500 |
| Marble Tiled Floor Installation | $2,500 - $4,500 |
| Custom Paint & Trim Detailing | $1,500 - $3,000 |
| Total Estimated Cost | $14,600 - $27,100 |
Material Brand Spec
- Paneling: Real solid pine or poplar tongue-and-groove (avoid pre-primed MDF in a wet zone). Spec moisture-resistant version near the tub.
- Stone: Bardiglio Imperiale honed, or Pacific Grey marble.
- Vanity: Custom American walnut, satin-finished oil. Henrybuilt makes a stock version; for the same price-tier, a regional Hudson Valley mill will custom-build to your exact dimensions.
- Sconces: Allied Maker Tubular sconce or Apparatus Studio Lariat.
- Towel warmer: Vola T39 or Runtal Fain — both ship to U.S. with hardwired or hydronic options.
- Wall paint: Farrow & Ball Lamp Room Gray or Benjamin Moore Coventry Gray.
Color Palette
Soft Grey Paneling
#BCC1C2
A pale, calming grey paint on textured wood paneling.
Bardiglio Grey Marble
#8F9599
Active grey stone with white veining doing the visual work.
American Walnut
#8A624A
Rich, medium-dark wood tone bringing warmth.
Satin Brass
#D4AF78
Warm gold tones in lighting, faucets, and towel warmer.
Renovation Notes for Similar Spaces
- Vertical paneling pulls the eye upward and adds apparent ceiling height — a useful trick in older Northeast bathrooms with the standard 8-foot ceiling. Use moisture-resistant MDF or properly sealed solid stock; standard pine paneling will cup within two heating seasons.
- When you pair busy stone with visible wood grain, simplify the vanity face. Flat-front drawers and one open shelf prevent the room from going visually loud.
- Hydronic towel warmers tied into the boiler loop are the gold standard, but a hardwired electric model with a dedicated 20A circuit is a much easier retrofit during a renovation. Specify the rough-in on the electrical plan.
- Pick sconces that throw light at face height rather than only down at the counter. Elongated vertical fixtures on either side of the mirror are still the best bathroom-grooming light a designer can specify.
- Tongue-and-groove paneling in a bathroom needs an air gap and a vapor barrier behind it. Otherwise the back face will absorb moisture and the boards will telegraph onto the front face within a year.
- If you're working in a Colonial Revival house, match the wainscoting profile to the existing trim package — bead size, panel module, base height. The new bath should feel like the rest of the house, just more disciplined.
8. Geometric Wallpaper and Dark Stone
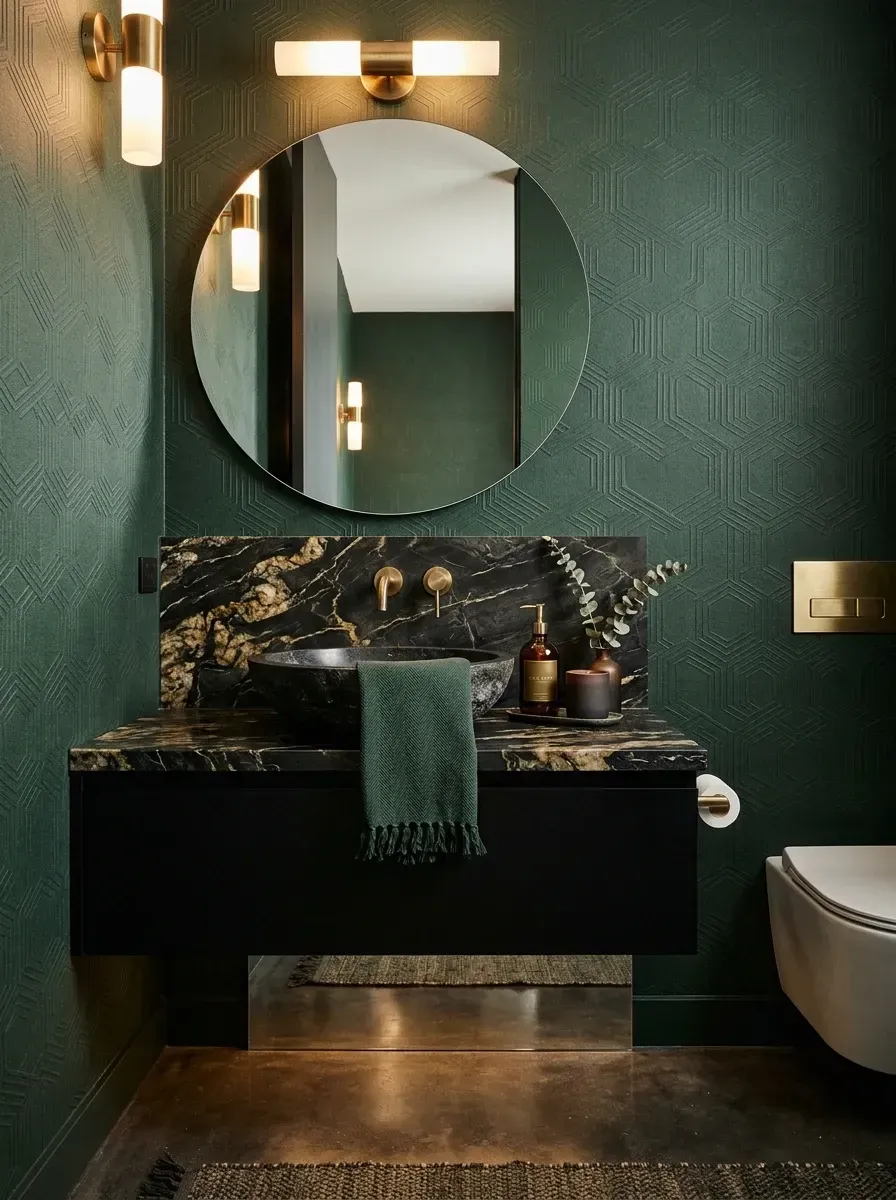
Quiet luxury can also be moody. This powder room uses a textured, geometric green wallpaper to make a small room feel deliberately enveloping rather than cramped. The vanity carries a spectacular black marble counter with gold and rust veining (likely Portoro or a close cousin), paired with a dark carved stone vessel sink. The black floating drawer below disappears so the stone and brass take the stage. Lighting is moody by design: brass sconces throw light at user-height, the overhead fixture is on a dimmer at 30%, and the marble veining is what reads as bright in the room — not the room itself.
This is the playbook I lean on for powder rooms in older Hudson Valley and Brooklyn houses where the original room is small and dark to begin with — fighting the geometry is more expensive than committing to it. The plan-aware version pre-decides the wallpaper width and pattern repeat against the room dimensions so the seams land at corners rather than dead-center on a wall. That is a millimeter-level conversation with the wallpaper installer that pays off in the way the finished room reads. A misplaced seam in the field of a wall is the kind of detail that costs nothing to plan and can't be repaired once installed.
Features
- Forest green geometric textured wallpaper (vinyl-coated, scrubbable)
- Black marble countertop with heavy gold/orange veining (Portoro or St Laurent)
- Dark carved stone vessel sink (basalt or honed limestone)
- Minimalist matte black floating vanity drawer
- Aged brass wall-mounted faucet
- Brass sconces (x2) flanking the mirror
Cost Analysis
| Decor Item (Qty) | Total Price Range |
|---|---|
| Exotic Black & Gold Marble Countertop & Splash | $3,000 - $6,000 |
| Designer Textured Wallpaper (Material + Install, scrubbable vinyl) | $1,500 - $3,000 |
| Carved Stone Vessel Sink | $800 - $1,500 |
| Custom Floating Black Vanity Drawer | $1,500 - $3,000 |
| Brass Wall-Mount Faucet Set | $800 - $1,400 |
| Brass Sconces (x2) & Ceiling Light (Dimmable) | $1,000 - $2,000 |
| Drywall Level 5 Finish (Behind Wallpaper) | $400 - $800 |
| Total Estimated Cost | $9,000 - $17,700 |
Material Brand Spec
- Wallpaper: Phillip Jeffries grasscloth, Calico Wallpaper, or Cole & Son in a vinyl-coated rendering. Scrubbable rating is non-negotiable in a powder room.
- Stone: Portoro Gold or St Laurent (warmer black with brown-gold veining); ask the fabricator for hand-selected slabs.
- Vessel sink: Stone Forest carved basalt or limestone, or Lacava Aquatic in volcanic stone.
- Faucet: Watermark Loft 2.0, Newport Brass East Linear, or Brizo Litze in unlacquered brass.
- Sconces: Cedar & Moss Alta or Visual Comfort Gilman in aged brass.
Color Palette
Forest Green Texture
#2F4F42
A deep green carried by the textured wallpaper.
Black & Gold Portoro Marble
#1A1712
Dramatic black stone with gold and rust veining doing all the talking.
Matte Black
#0D0D0D
Receding black tones for the vanity cabinet and vessel sink.
Aged Brass
#C9A45C
Brass that picks up the warm veining inside the marble.
Renovation Notes for Similar Spaces
- Powder rooms are short-stay spaces. They reward dark colors and bold patterns that would be exhausting in a primary bath where you're getting ready for an hour at 6:30 a.m.
- When the stone is loud, the carcass beneath it has to be silent. A solid matte black drawer face or a single walnut slab is the right answer; anything ornate competes and loses.
- Specify a vinyl-coated, scrubbable wallpaper rated for bath humidity. Standard wallpaper pastes will let go at the seams within a year if you don't.
- Light the user and the stone, not the room. Two sconces flanking the mirror plus a small picture light over the splash will outperform any overhead fixture in a moody powder room.
- Plan the wallpaper layout before purchase. Field-set seams in the corners, not the center, and order at least 15% extra for matching pattern repeats.
- Drywall behind designer wallpaper needs a Level 5 finish. Ridges, screw pops, and texture variation will telegraph through the paper, especially with grasscloth or any vinyl with a sheen.
9. Fluted Walls and Integrated Lighting
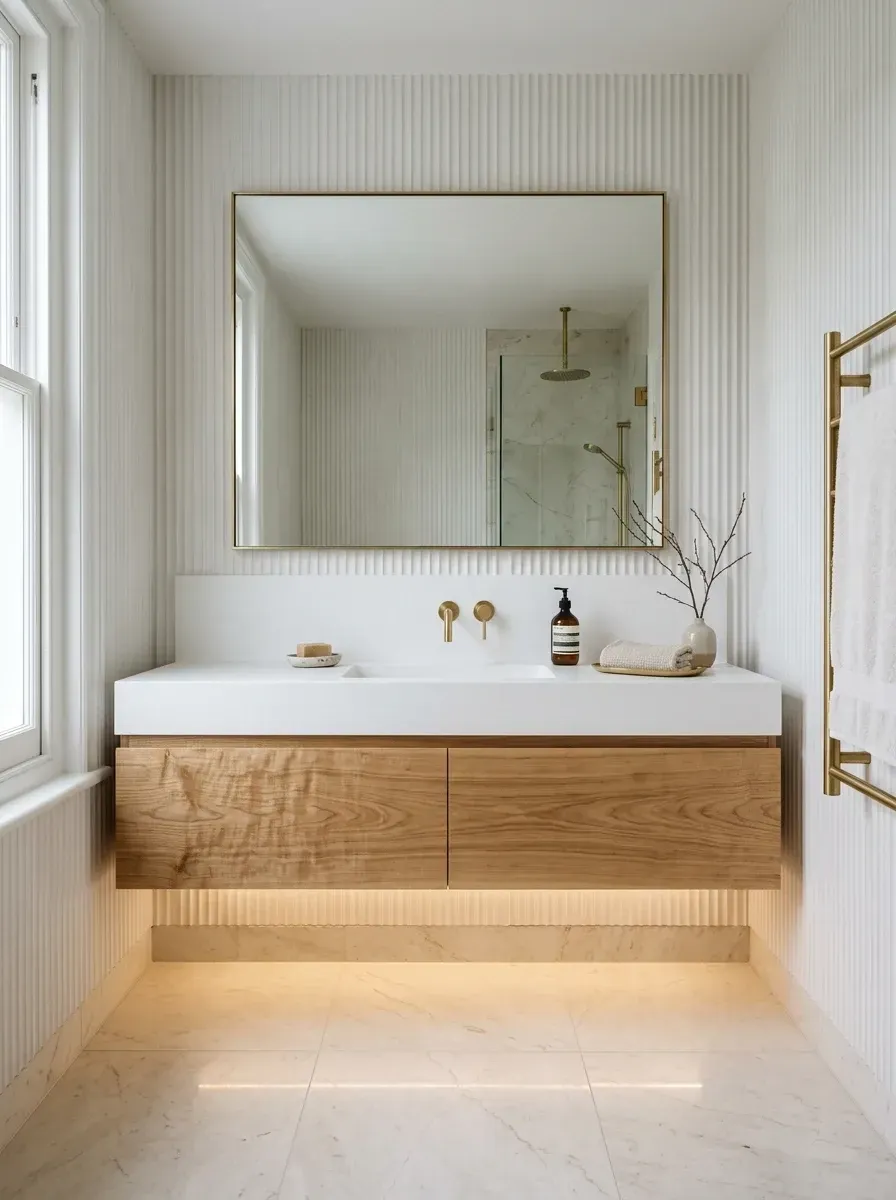
This space shows how architectural texture can replace styling. The back wall is covered in white fluted paneling, which gives the room a soft, rhythmic backdrop without adding a single object. A thick solid surface counter with an integrated sink sits over a floating wood vanity with very strong figured grain. The detail that does the heaviest work is the warm LED strip hidden under the vanity — it washes light down the fluted wall and makes the heavy wood cabinet read as weightless. The lighting gain here is a framing-stage decision: the wires need to land in the right wall cavity before drywall closes, with the fluted panels shop-drawn around the LED channel.
Fluted paneling is a deceptively complex material. It looks like a single board with grooves; in practice, it is either a stack of half-round mouldings on a backer (cheaper, less crisp) or a single CNC-routed sheet (more expensive, far better profile consistency). The decision changes the framing dimension by 1/2" to 1" depending on which version you pick, which means the framer has to know before he frames the wall. Fluted material I'd actually spec: Forescolor or Trada CNC-routed wood paneling, or a custom mill-run from a regional shop using poplar primed for paint. Avoid the foam-core or vinyl flute imitations sold at big-box retailers — the profile is wrong and they read as plastic across a room.
Features
- Floor-to-ceiling white fluted wall paneling (CNC-routed)
- Floating wood vanity with figured ash or oak grain
- Thick solid surface (Corian or Hi-Macs) countertop with integrated sink
- Under-cabinet warm 2700K LED strip with diffuser channel
- Brass wall-mounted fixtures and towel warmer
- Marble field tile flooring
Cost Analysis
| Decor Item (Qty) | Total Price Range |
|---|---|
| Custom Floating Wood Vanity (figured grain veneer) | $3,500 - $6,000 |
| Solid Surface Integrated Sink Countertop (Corian / Hi-Macs) | $2,500 - $4,500 |
| Fluted Wall Paneling (CNC Material + Install) | $3,000 - $5,500 |
| Integrated LED Strip Lighting System (Material + Electrician) | $800 - $1,500 |
| Brass Wall-Mount Faucet & Shower Fixtures | $1,500 - $3,000 |
| Marble Floor Tile Installation | $2,500 - $4,500 |
| Steel Ledger Plate for Floating Vanity | $500 - $1,000 |
| Total Estimated Cost | $14,300 - $26,000 |
Material Brand Spec
- Fluted paneling: Forescolor CNC-routed white-painted poplar, or a custom mill-run paneling from a regional shop. Avoid foam or PVC imitations.
- Counter: Corian Designer White or Hi-Macs Sanded Concrete with thermoformed integrated sink.
- Vanity wood: Figured ash or rift-sawn white oak with strong grain pattern.
- LED: WAC InvisiLED Pro 3 at 2700K with KLUS aluminum diffuser channel.
- Faucet: Brizo Litze, Kallista For Loft, or Watermark Sense in unlacquered brass.
Color Palette
Crisp White
#FFFFFF
Clean white used on the fluted walls and countertop.
Figured Ash or Oak
#C4A781
A light-to-medium wood with a very distinct, wavy grain pattern.
Warm LED Glow (2700K)
#FFEDCC
The warm light itself reads as a color element in the space.
Satin Brass
#D9B87D
Adds warmth against the stark white backdrop.
Renovation Notes for Similar Spaces
- Integrated lighting is a planning problem before it is a fixture problem. Mark the LED routing on the electrical plan and walk it with the electrician at rough-in, before drywall closes the wall.
- Always specify an aluminum diffuser channel for under-cabinet LED tape. A bare strip throws a row of dot reflections onto the floor tile that destroys the calm-light effect you paid for.
- Stay at 2700K or 3000K for any bathroom under-glow. Anything cooler reads as commercial restroom and fights the brass.
- Solid surface integrated sinks (Corian, Hi-Macs, Krion) give you a continuous counter-to-basin pour with no joint. They scratch easier than stone but those scratches buff out — a tradeoff most clients accept once they see the cleaning advantage.
- Fluted paneling reads strongest when lit obliquely. The under-vanity LED strip casting up the wall is the single biggest move; ceiling-down recessed lighting on the same wall flattens the texture.
- If you use figured wood veneer on the vanity, ask for sequence-matched panels across the door fronts. Random panel veneers look like off-the-shelf cabinetry; sequence-matched ones look like a single grown tree, which is the actual luxury tell.
10. Sage Plaster and Recessed Storage
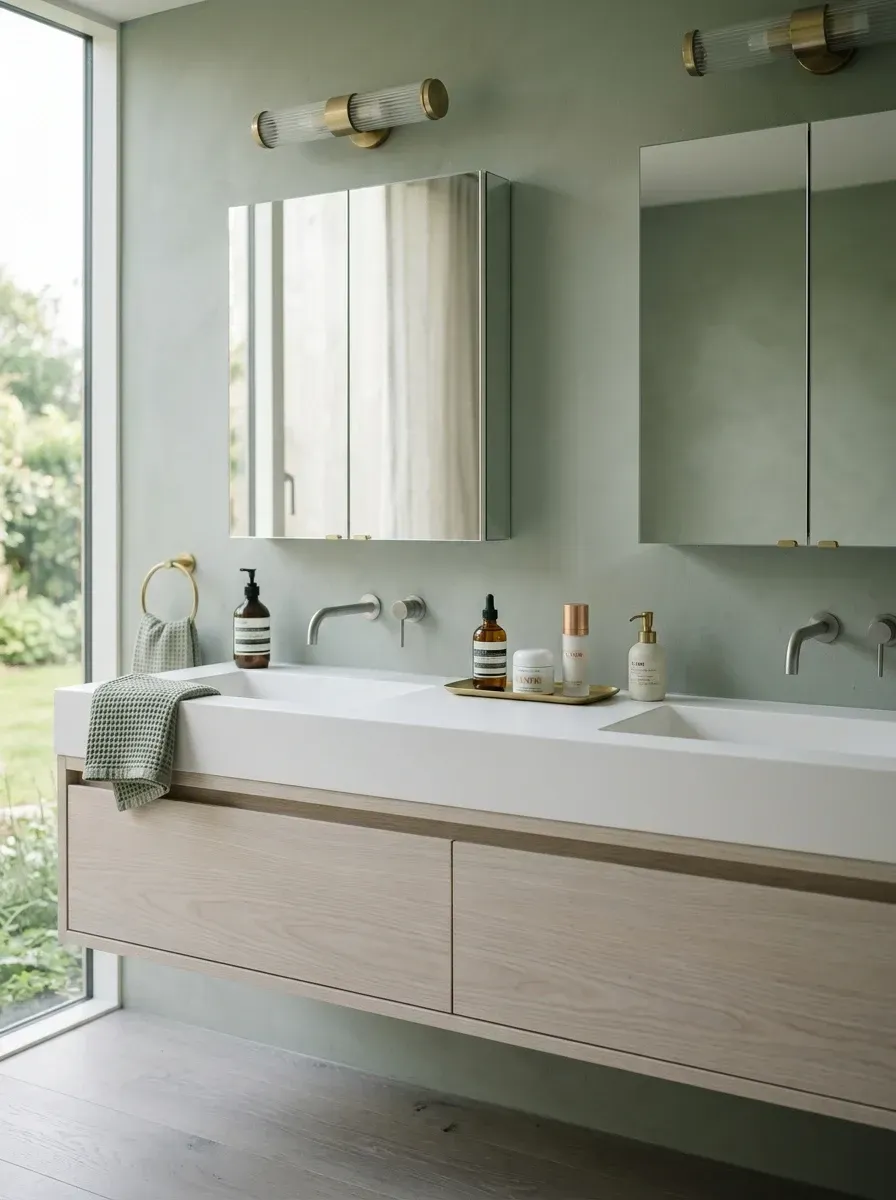
This last bathroom is the cleanest illustration of what I call "unseen storage as luxury." The sage walls are a lime wash or true plaster, with a velvety texture you can read across the room. The light oak floating vanity is sleek and handleless. But the move that makes the room work is the bank of three mirrored medicine cabinets, fully recessed into the wall. They give you significant storage volume while reading as flush, simple mirrors — and that reading is what keeps the countertop empty enough to feel calm.
Recessing medicine cabinets is the single highest-leverage move I know in any bathroom design. A standard primary bath needs 25–35 cubic feet of storage to actually function — daily skincare, prescription medication, dental care, toiletries, hand towels, paper goods, cleaning supplies. If that storage is open-shelved or surface-mounted, the room reads as cluttered no matter how good the materials are. If it is recessed flush behind a mirror, it disappears. The plan move is moving studs to open up a wall cavity deep enough to swallow the cabinet box (typically 4 inches), which means coordinating with whatever is on the other side of that wall — usually a closet, sometimes a hallway. This is the kind of approach I push hard for across the network's interior renovation archive: the storage you don't see is the storage that actually keeps a bathroom looking like the day it was finished.
Features
- Sage green lime plaster or lime wash walls
- Long, floating light oak double vanity
- Three fully recessed mirrored medicine cabinets (Robern grade)
- Thick white solid surface countertop with integrated sinks
- Horizontal tube brass sconces between the cabinets
- Push-to-open cabinet hardware (no visible pulls)
Cost Analysis
| Decor Item (Qty) | Total Price Range |
|---|---|
| Custom Floating White Oak Double Vanity (approx. 7 ft) | $5,000 - $8,500 |
| Solid Surface/Quartz Integrated Double Sink Top | $3,500 - $5,500 |
| High-End Recessed Medicine Cabinets (x3, Robern Uplift or PL Series) | $3,000 - $6,000 |
| Lime Plaster/Wash Wall Finish (Labor & Material) | $2,000 - $4,000 |
| Wall-Mounted Faucets (x2) | $1,200 - $2,400 |
| Horizontal Brass Sconces (x2) | $800 - $1,600 |
| Framing Modifications for Recessed Cabinets | $800 - $1,500 |
| Total Estimated Cost | $16,300 - $29,500 |
Material Brand Spec
- Recessed cabinets: Robern Uplift, PL Series, or M Series with integrated outlets and lighting. The Kohler-owned Robern line is the U.S. standard; the Uplift in particular has the deepest box (8" interior) at this price tier.
- Plaster: Bauwerk Colour Lime Wash in a sage green, or Portola Roman Clay tinted to a custom green. For true plaster: Marmorino Veneziano applied by a specialist.
- Vanity: Custom rift-sawn white oak from Henrybuilt or a regional mill, satin-oiled finish.
- Counter: Caesarstone Pure White or Corian Glacier White integrated double sink.
- Sconces: Apparatus Studio Tube or Allied Maker Tubular wall sconce in aged brass.
Color Palette
Muted Sage Green
#A4B0A0
A calm, earthy green with a matte, plastered texture.
White Oak
#C7B299
Light, natural wood that complements the green.
Matte White
#F2F2F2
A clean, non-reflective white surface.
Aged Brass
#B59866
Used in lighting and hardware to add warmth.
Renovation Notes for Similar Spaces
- Recessing medicine cabinets is the single best move for reducing visual clutter in a bathroom. It requires moving studs to fit the cabinet box into the wall cavity — a framing-stage decision, not a finish-stage one.
- If a structural or plumbing wall blocks full recessing, semi-recessed cabinets (where only an inch or two stands proud) are still a major improvement over surface-mount.
- Push-to-open hardware or integrated channel pulls keep the vanity face fully clean. Specify the cabinet hinges that match your push mechanism — not all soft-close hinges play nicely with push-to-open fronts.
- Sage green is functioning as a new neutral in design-forward bath specs right now. It pairs cleanly with both warm metals (brass, antique bronze) and cool ones (brushed nickel, polished chrome).
- Spec recessed cabinets with integrated outlets and LED lighting on the interior. The hidden electric outlet is what eliminates the dangling-charging-cable clutter that destroys most "minimal" bathrooms.
- Lime wash walls develop their final texture and color over 3–4 weeks of curing. Don't judge the finish on day one — and don't let the painter touch up small areas before that, because the touch-ups will read as patches forever.
The Quiet Luxury Material Hierarchy
Here is how I actually think about material specification for this aesthetic, organized by category and tier. The goal is not to spec the top tier on everything — it's to know where the visible-investment dollars go and where you can step down without breaking the aesthetic.
Faucet Tiers (Wall-Mounted Single-Hole)
- Top tier ($1,500–3,500): Vola FS series, Dornbracht Tara Logic, Waterworks Henry, Kallista For Loft. Solid forged brass, machined to tolerances that make the lever motion feel like a Leica shutter.
- Designer tier ($800–1,500): Watermark Loft 2.0, Brizo Litze, Newport Brass East Linear, Hansgrohe AXOR Citterio. The aesthetic delivery is identical from across the room; the lever feel is slightly less precise.
- Smart-spec tier ($400–800): Kohler Components, Moen Doux, Delta Trinsic. Clean profile, decent finish, won't read as builder grade if specified in matte black or matte gold rather than chrome.
- Avoid: Anything from the $200-and-under range with chrome-plated zinc bodies. The plating wears at the lever pivot within three years.
Wall Finishes (in order of visual impact)
- True lime plaster (Marmorino Veneziano, Tadelakt): $9–14/sf installed. The benchmark. Requires a specialist plasterer — there are maybe 30 in the entire Northeast renovation market.
- Roman Clay (Portola, Bauwerk): $4–7/sf installed. 80% of the visual texture at half the labor cost. Any skilled painter can apply it after one project.
- Lime wash (Kalklitir, Bauwerk Colour): $3–5/sf installed. Color-rich, slightly less textural than Roman Clay, beautiful in matte saturated tones (sage, terracotta, ochre).
- Tongue-and-groove paneling: Architectural rhythm rather than texture. Best in transitional/historical homes; can feel forced in modern envelopes.
- Avoid: Faux-plaster textured paint products from big-box retailers. They look like textured paint, not plaster.
Stone Sourcing
- Buy from the slab yard, not from the fabricator's catalog. Walk the yard, mark the slab you want, and have it set aside. Fabricator-picked stones tend to be the bottom of the bunk — not because the fabricator is dishonest, but because the best slabs get cherry-picked by walk-in clients.
- Calacatta vs Statuario vs Carrara: Calacatta has bolder gold/grey veining and the highest price point ($120–250/sf slab). Statuario has crisp grey veining on a colder white ($90–180/sf). Carrara is the budget-tier "white marble" with finer, softer veining ($45–80/sf) — still beautiful, less dramatic.
- For black stone: Nero Marquina (sharper veining), St Laurent (warmer browns), Portoro (gold and orange veining — the powder-room favorite).
- Stone remnants (the "boneyard"): Most fabricators sell the leftover pieces from larger jobs at 30–60% of slab pricing. For a powder room or a single-sink vanity, this is the smartest spend in the entire project.
- Stone alternatives: Quartzite (Taj Mahal, Sea Pearl) is harder than marble, etches less, costs more. Engineered stone (Caesarstone, Silestone) is fine for kitchens but reads as plastic in this aesthetic — avoid in the bathroom.
Cabinet Tiers
- Top tier: Henrybuilt (Seattle, ships nationally), local custom mill ($600–900/linear foot). Hand-built, sequence-matched veneers, push-to-open hardware native.
- Designer tier: Reform (DK, IKEA-base with designer fronts), Semihandmade (IKEA SEKTION-base with custom fronts). $300–500/linear foot. Real solid wood fronts, decent box quality.
- Mid-tier: KraftMaid, Fabuwood, Decora. Real plywood boxes, paint-grade or stained doors. $200–350/linear foot. Acceptable in a non-headline location like inside a recessed cabinet bay.
- Avoid: Particleboard-box cabinets with thermofoil fronts. They will fail at the heat-vent edge within five years.
Recessed Medicine Cabinets
- Robern (Kohler-owned) is the U.S. industry standard. The Uplift, PL Series, and M Series cover most needs. Spec the integrated electrical and LED lighting upgrades.
- Restoration Hardware Wynwood for a more architectural mirror frame.
- Element by Robern as the budget-spec ($600–1,200) recessed option — fewer features, same recessed effect.
- Avoid: The $300 surface-mount "recessed-look" cabinets sold at home centers. The bevel detail and the protrusion give them away immediately.
When Each Decision Hits the Calendar
This is the most important takeaway in the article. Each of the moves I've described above has a stage in the renovation timeline when it has to be locked in. Miss the stage, and the move either gets value-engineered out or costs 3–5x to retrofit later. Here is the actual order:
- Design phase (weeks 1–4): Floor plan locked, alcoves and recessed niches drawn, structural moves identified, integrated-storage walls coordinated with whatever is on the other side.
- Stone selection (weeks 4–8): Slabs walked at the yard, fabricator engaged, shop drawings produced. Plumbing rough-in coordinates pulled from the shop drawings.
- Demo and framing (weeks 8–11): Steel ledgers installed, framing modified for recessed cabinets, header beams set for window walls, alcove walls framed.
- Rough-in (weeks 11–13): Wall-mounted faucet valves located, LED feed wires pulled to vanities and niches, in-wall toilet carriers set, drain locations finalized.
- Inspections and close-up (weeks 13–14): Drywall over framing. After this, structural changes cost 3–10x what they would have cost yesterday.
- Plaster / paint (weeks 14–17): Specialist plaster applies; standard paint follows. Lime wash and Roman Clay both need 3–4 weeks of cure time before stone gets close.
- Stone install (weeks 17–18): Vanity slabs set. This is the moment of truth on every decision made in weeks 4–13.
- Finish trim and fixtures (weeks 18–22): Faucets, mirrors, sconces, accessories. The fun part — and the only part you cannot improvise on, because the structure under it has already been committed.
What I Tell Clients to Do
- Recess every medicine cabinet, even at the cost of moving studs and re-routing one duct.
- Walk the slab yard before stone purchase; reject any slab the fabricator picked without seeing.
- Spec wall-mounted faucets and put the rough-in coordinates on the framing drawings.
- Buy unlacquered brass and let it patina — that is the actual luxury tell.
- Layer your lighting: a face-height sconce, a hidden LED accent, and one ceiling layer, each on a separate dimmer.
- Spec a Level 5 drywall finish behind any wallpaper or specialty plaster.
- Use stone remnants for powder rooms and single-sink vanities to land luxury stone at half the cost.
What I Tell Clients to Avoid
- Surface-mount medicine cabinets in any primary bath, regardless of budget. They never look right.
- Engineered quartz countertops in a bathroom — the pattern repeats are visible at this scale.
- Drop-in vessel sinks with deck-mounted faucets — the deck plate visually breaks the counter.
- Builder-grade chrome fixtures. The plating fails, the lever feels hollow, and the finish ages badly.
- Faux-plaster textured paint or sand-grit additives sold at big-box retailers — they read as textured paint.
- Cool-temperature LED lighting (4000K+). It fights brass and reads as commercial.
- Pre-fab "luxury vanities" sold as a single unit at retailers; they have particleboard boxes and thermofoil edges.
- Large-format glossy floor tile — it shows every smudge and reads as commercial.
How This Works in Northeast Renovation Stock
Most of my project work is in the renovation belt running from Brooklyn up through the Hudson Valley into southern New England — Beacon, Rhinebeck, Kingston, Hudson, Cold Spring, Brooklyn brownstones, Hartford Colonial Revivals, Providence Federals, Portland Maine capes. The quiet luxury aesthetic translates differently across this geography, and the plan-aware version of the room respects the original building's bones.
- Hudson Valley farmhouse renovation: Reclaimed timber, lime plaster, brass, troweled concrete. The Wabi-Sabi reading (Section 4) lands here naturally because the existing structure already has rough material memory.
- Brooklyn / Queens brownstone: Recessed marble alcoves, dark wainscoting, steel-frame interior windows. The Architectural Black Marble Tub (Section 2) is a strong fit — you have the high ceilings and the existing ornament to support it.
- Hartford / New Haven Colonial Revival: Vertical paneling and grey marble (Section 7). The historical envelope wants the wainscoting; the contemporary materials borrow its rhythm.
- Providence Federal / Portland Maine cape: Smaller rooms; the powder-room and vessel-console approaches (Sections 6 and 8) read more naturally than the floating-vanity primaries.
- Burlington Vermont / Catskills weekend cottage: The reclaimed timber and lime wash combination (Sections 4 and 10) reads as a continuation of the building's New England material language.
If you're working from a stock house plan and trying to renovate it toward this aesthetic, it's worth reading the plan with these moves already in mind — many of the decisions above are easier to make at the plan stage than at the renovation stage. The network's archive of house plan reviews walks through that read for specific listings, and the design-mindset archive covers the broader before-you-renovate thinking in more depth than I can fit in a single guide.
Plan-Aware Pro Tips
- Spend on the systems you can't see. The most important purchases in any of these bathrooms are the in-wall toilet carriers, the steel ledger plates supporting floating vanities, and the precise rough-in valve boxes for wall-mounted faucets. Those are the components that create the floating, effortless reading. Cut anywhere else first.
- Specify texture before you specify color. Lime plaster, honed marble, fluted oak, troweled concrete — the surface variation is what makes these rooms reward a long look. Paint chips are a finish-stage decision; texture is a planning-stage decision.
- Treat lighting as architecture, not as fixtures. A pair of dimmable face-height sconces plus one hidden LED accent will outperform a ceiling full of recessed cans every time. Layer the layers; put each one on its own switch.
- Decide the "no" list first. Before picking finishes, agree with yourself on what won't appear in the room — surface-mount cabinets, white PVC traps, undercount lights with no diffuser, glossy laminate, decals on the mirror. The discipline of the no-list is what makes the yes-list read as luxury.
- Read the plan before you buy a single tile. Every detail in this article — recessed cabinets, integrated sinks, floating slabs, hidden lighting — costs almost nothing to add at the framing stage and tens of thousands to retrofit later.
- Build a "spec book" for your bathroom. A simple binder or PDF with cut sheets for every product — faucet model, stone slab photo, plaster sample, paint chip, light fixture spec. When the GC has a question on Tuesday morning, the answer is in the book, not in your inbox archive.
- Sequence-match your wood veneers. Whether on a vanity or a floating shelf, sequence-matched veneers read as a single grown tree. Random panels read as off-the-shelf. The cost difference is roughly 15%; the visual difference is much larger.
Cost-Saving Moves That Don't Read as Cuts
- Use stone remnants. For powder rooms or single-sink vanities, source your marble or quartzite from a fabricator's "boneyard" — the cutoffs left from kitchen jobs. You can land high-end stone for a fraction of slab pricing if your countertop is under about 30 square feet.
- Fake the plaster look. True lime plaster is labor-intensive. Specialty paints like Roman Clay, lime wash, or limestone-grit acrylics give you 80% of the visual texture at a fraction of the labor cost, and any skilled painter can apply them. Reserve the real plaster for the one wall that will be lit closely.
- Recess one cabinet, not three. A single recessed mirrored cabinet over the primary sink reads as the high-end move. Pair it with a flat surface mirror over the secondary sink — you save the framing labor and most viewers won't notice the asymmetry.
- Splurge on what you touch every day. A solid brass faucet (Vola, Watermark, Waterworks-grade) costs four times a builder-grade unit and feels like four times the luxury every morning. Save on what you only look at — light fixtures from a smaller brand, a quality off-the-shelf vanity instead of full custom — and pour the savings into the hardware.
- Substitute IKEA SEKTION boxes with Reform or Semihandmade fronts. The IKEA box is solid; the design of a Reform front in real solid oak will read as a $9,000 vanity for closer to $3,500 installed.
- Run a stone splash, not a stone wall. A 6-inch marble splash is the move that visually links your vanity counter to the wall. A full-height stone wall behind the vanity reads almost identically in a photograph and costs 4–6x more.
- Skip designer tile in favor of standard format porcelain. A 24x48 honed matte porcelain in a warm-grey from Mosa or Florim looks nearly indistinguishable from honed limestone at one-quarter the cost. Save the limestone for the curb of the shower where you'll actually see it close.
- Use one statement fixture, not five. One Apparatus Studio Tube sconce above the mirror reads as a serious design choice. Two cheaper sconces and a third overhead pendant read as a designer-shopped showroom. Pick the one and let it carry.
The network's kitchens and baths archive has more on where the marginal-dollar ROI actually lands across full bathroom renovations, including before-and-after cost analyses on real projects.
Final Result & Atmosphere
- The result of prioritizing integrated architecture and authentic materials is a bathroom that feels intensely calm and unmistakably solid. It is a room that doesn't lean on styling tricks or trend cycles to feel resolved — which means it dates much more slowly than a "designed" bathroom that depends on this season's tile.
- By removing visual clutter — the visible P-trap, the chunky vanity legs, the surface-mounted cabinet — the eye is given permission to rest on the materials. That is the actual mechanism of "quiet" in quiet luxury: silence around the things that earn the attention.
- The atmosphere is not fragile or precious; it is grounded. These rooms are designed to age. The patina on unlacquered brass, the warm gray of soaped white oak, the slight smoothing of lime plaster around the most-used switch — these are not flaws to be touched up. They are the visible record of the room being lived in. That, more than the marble, is the thing the price tag is buying.
- And one more reality check: this aesthetic is not minimalism in disguise. A real quiet luxury bathroom has just as many objects in it as a normal bathroom — the same toothpaste tube, the same hairbrush, the same prescription bottles. The difference is that the room was designed with a place to put each one out of sight. Subtraction is the visual outcome; planning is the actual mechanism.
Frequently Asked Questions
What actually defines a quiet luxury bathroom?
A quiet luxury bathroom is defined less by what is added and more by what is removed. The visual signal is honest material — solid stone, real wood, unlacquered metal — paired with integrated architectural details such as recessed cabinets, integrated sinks, and hidden plumbing. What you read as "expensive" is usually the construction quality of those details, not ornament.
How is quiet luxury different from regular minimalism?
Regular minimalism subtracts. Quiet luxury subtracts decoration but adds material weight. A minimalist bathroom can be solved with white tile and a builder-grade vanity. A quiet luxury bathroom requires honed stone, real plaster, recessed cabinets, and structural integration. The aesthetic looks similar in photographs and reads completely different in person.
Are quiet luxury bathrooms expensive to build?
Yes — the entry cost is roughly 30–60% higher than a comparable mid-grade remodel because the look depends on natural materials and skilled trades rather than off-the-shelf decor. Achieving a wall of true lime plaster or a custom integrated stone vanity requires specialists whose day rates run well above general carpentry labor, and that gap is where most of the budget goes.
What is the best wall finish for a quiet luxury bathroom?
True lime plaster (Marmorino Veneziano, Kalklitir, or a Tadelakt application by a qualified specialist) is the highest-tier finish. For most projects, a Roman Clay product like Portola Paints' Roman Clay, or a quality lime wash, gets you 80% of the textural read at a fraction of the labor cost. Avoid standard flat paint pretending to be plaster — the difference is visible across a room.
What are the best colors for a quiet luxury bathroom?
The palette is usually subdued and rooted in nature — warm cream, taupe, terracotta, sage green, charcoal. The depth comes from material texture (the variation in marble veining, the grain of walnut, the chalkiness of plaster) rather than bright pigment. If you can name the paint color from across the room, the palette is probably too loud for this aesthetic.
Which faucet brands fit the quiet luxury aesthetic?
At the top tier: Vola, Waterworks Henry, Dornbracht, Watermark Loft, and Kallista. Mid-tier alternatives that read as quiet luxury: Brizo Litze, Kohler Purist (in matte black or unlacquered brass), Newport Brass East Linear, and Hansgrohe AXOR Citterio. Avoid heavily ornamented spouts, two-tone finishes, or anything with crystal handles — the aesthetic asks for one continuous form, one finish.
What does a plan-aware bathroom renovation actually mean?
It means reading the floor plan and the rough-in drawings before you choose finishes — not after. Wall-mounted faucets, recessed niches, floating vanities, and integrated lighting all need their plumbing and structure located during framing. Those decisions are inexpensive to make on paper and very expensive to undo once drywall is up.
How do I get the quiet luxury look on a real renovation budget?
Spend on what you touch and what is structural; save on what is visual filler. A stone remnant for a vanity top, solid brass faucets, and a recessed medicine cabinet read as luxury. Standard matte porcelain tile, lime-wash paint instead of true plaster, and a quality off-the-shelf floating vanity carry the rest of the room without eroding the look.
Does quiet luxury work in small bathrooms and powder rooms?
Powder rooms are arguably the best canvas for the aesthetic. Because you only spend a few minutes there, you can commit to dark colors, dramatic stone, and bold textured wallpaper that would feel oppressive in a primary bath. A small powder room with one stone slab, one good light fixture, and one wallpaper roll often reads more luxurious than a 200-square-foot primary.
How long does a quiet luxury bathroom renovation typically take?
Plan for 10–16 weeks of construction in a Northeast renovation context, plus 6–10 weeks of design and material lead time before construction starts. The schedule extension over a standard remodel comes from custom stone fabrication (4–6 weeks), specialist plaster scheduling, and the longer rough-in coordination required for integrated details.
Conclusion
Quiet luxury in a bathroom is, in the end, a discipline of restraint applied at the right stage of the project. It is the confidence to let three or four honest materials speak for themselves without piling on decoration that competes with them. It is the discipline to recess what can be recessed, float what can be floated, and integrate what can be integrated — and to make those calls at the framing stage, when they cost almost nothing, rather than at the finish stage, when they cost a second renovation.
The bathrooms in this guide are not photographs of a trend. They are records of decisions made in the right order. The aesthetic is reproducible — but only if you read the plan first and renovate second. If you do, the room arrives looking inevitable, ages gracefully, and stops feeling designed within a month of moving in. That is the only kind of luxury I have ever seen actually hold up over time, and the only kind I'd want to spend a client's renovation budget on.
References & Sources
- Architectural Digest — Quiet Luxury in Interior Design
- Remodelista — Remodeling 101: Bathroom Countertops
- Dwell — Minimalist Bathroom Design Ideas
- This Old House — Bathroom Remodel Cost Guide
- Natural Stone Institute — Care & Cleaning of Natural Stone
- Houzz — Bathroom Design Trends and Cost Reports
- NKBA — National Kitchen and Bath Association Design Guidelines
- Robern (Kohler) — Recessed Medicine Cabinet Specifications

Nora Whitfield
Renovation Designer & Interiors Editor · Beacon, New YorkNine years of design-build renovation work across the Hudson Valley and the Northeast. Nora runs the Renovations, Room Guides and Renovation Mind desks — before-and-after studies, room-by-room design guides, and the long essays on why what we renovate matters.
More from Nora →
Reader notes